
DIY: Auxiliary on Base Fit
#161
 01-18-2011, 12:39 AM


Awesome article!!
For the longest time I've had an FM transmitter hooked up to my Ipod to listen to music. After reading the article about hooking up the Aux in the Jazz, I decided to go for it. It cost me about 25 bucks for the parts and took about 4 hours in total.
Thanks again for the great advice!!!
Thanks again for the great advice!!!
#162
05-22-2011, 10:49 PM


Long Term Problem

I have been enjoying my custom aux input for almost a year. About two weeks ago the sound started going out during turns and over bumps.
I tried a new 1/8" cable and checked the aux jack in the center console. I did not find the problem until I took out the head unit to check those connections.
I had the foam backed cable zip tie mount (shown in the pic) fail. I would guess this was from heat. One of the leads in the rear was slightly pulling off the pin.
I used a new cable mount in a different position closer to near edge of the head unit. Has anyone else seen one of these pull apart like this?
(Since this was the second time taking out the head unit, I was able to do this in under an hour!)
#163
07-05-2011, 09:36 AM

Disclaimer: Do this at your own risk!
Things needed:
- CUI Inc 3.5mm panel mount audio jack w/ 4 connectors (PN: SJ-43502PM)
- 22 gauge electrical wire
- solder hardware or crimping
- drill and 1/4 drill bit
Installation:
First, find the place you want to mount your 3.5mm jack. I chose the same spot as it is in the Sport Fit. I started by drilling a smaller hole first and then working my way to the 1/4" size bit. If you purchase a different 3.5mm jack make sure you check if it is suitable for 1/4" size bit.
Here are pics of the two screws that hold in the little bracket.

Pic of the jack screwed into the bracket.

It was already pretty tight without the nut, but I put it on there anyways just in case. Oh yeah for the BLING factor too!

Second, solder about 5 feet of 22 gauge wire onto each of the 4 connectors on the 3.5mm plug and heatshrink or electric tape them. Mark each cable so you remember which one is which.

Third, remove the headunit and then mount the 3.5mm plug and route the cable up to the back of the headunit.
Fourth, time to solder or crimp the wires coming from the 3.5mm plug to the back of the headunit.
Use Diagram B and connect the following:
3.5mm Jack to Harness
Terminal 1 to B15 (AUX DET)
Terminal 2 to B14 (AUX R)
Terminal 3 to B13 (AUX L)
Terminal 4 to both B3 (AUX SIG GND) and B4 (AUX SHIELD GND)

Here are B13 and B14 soldered and I have the heatshrink ready to be shrunken.

It's a pretty easy installation. It is just time consuming getting the headunit out etc. Let me know if you guys need any more detail.
What it might look like when you are done.

Things needed:
- CUI Inc 3.5mm panel mount audio jack w/ 4 connectors (PN: SJ-43502PM)
- 22 gauge electrical wire
- solder hardware or crimping
- drill and 1/4 drill bit
Installation:
First, find the place you want to mount your 3.5mm jack. I chose the same spot as it is in the Sport Fit. I started by drilling a smaller hole first and then working my way to the 1/4" size bit. If you purchase a different 3.5mm jack make sure you check if it is suitable for 1/4" size bit.
Here are pics of the two screws that hold in the little bracket.
Pic of the jack screwed into the bracket.
It was already pretty tight without the nut, but I put it on there anyways just in case. Oh yeah for the BLING factor too!
Second, solder about 5 feet of 22 gauge wire onto each of the 4 connectors on the 3.5mm plug and heatshrink or electric tape them. Mark each cable so you remember which one is which.
Third, remove the headunit and then mount the 3.5mm plug and route the cable up to the back of the headunit.
Fourth, time to solder or crimp the wires coming from the 3.5mm plug to the back of the headunit.
Use Diagram B and connect the following:
3.5mm Jack to Harness
Terminal 1 to B15 (AUX DET)
Terminal 2 to B14 (AUX R)
Terminal 3 to B13 (AUX L)
Terminal 4 to both B3 (AUX SIG GND) and B4 (AUX SHIELD GND)
Here are B13 and B14 soldered and I have the heatshrink ready to be shrunken.
It's a pretty easy installation. It is just time consuming getting the headunit out etc. Let me know if you guys need any more detail.
What it might look like when you are done.
For some reason the photos of your installation of the AUX input on your Honda Fit are not showing up in any browser (perhaps because the original message is 4 yrs old!). Can you either repost the original photos or does anyone have these to send to me? Thanks!
#164
09-10-2011, 06:14 PM

Just installed a aux in to my Fit! Thanks to all of you who figured it all out. Did it under one hour. I used a standard TRS male plug connected B3 B4 B15 to the ground, B13 & B14 to the left and right. Works awesome and sounds great!
#165
11-23-2011, 07:51 PM

okay, I read this forum and am wondering if anyone has tried to use the aux radio sub wire harness from an CR-V. Part number 39117-SWA-A00. It was mentioned in one of the comments on Honda Fit Aux Jack installed! - sowbug.org.
I think I am going to go to the dealership after the thanksgiving holiday and order me one and see if it will work.. I will post the results once I get it in the car. For under $10, it is worth a shot to have plug and play connectivity.
I think I am going to go to the dealership after the thanksgiving holiday and order me one and see if it will work.. I will post the results once I get it in the car. For under $10, it is worth a shot to have plug and play connectivity.


#168
08-17-2012, 04:23 AM
I've been wanting to have the aux ports installed on my 2008 Fit Base since I got it brand new. It's a US model sold in Southern California. I hope the aux ports sold for the Sport are still available. Norm Reeves Honda in Cerritos California is now selling a blue tooth receiver unit for devices such as cell phones which they will install onto all Hondas including the Fit Base. Has anyone seen any wires hidden and taped anywhere between the radio and the dummy USB plug? I will try to make a wiring harness as described on this site. There is a Honda wiring book available through Helms which I may buy and use for color coding purposes.
#169
08-22-2012, 07:39 PM
Got the harness finally
Alright, It has been a long time, and but I bought the harness and got the new version of that audio jack in the OP's first post. The new part number is CP5-43502PM and got mine from Digikey for under $3 plus shipping. It looks like I am going to have to repin the connector, but it may fit (just gotta get the radio out first to check) . I will prob start a different posting on the progress of it.

#171
09-02-2012, 12:06 PM
I used the connector (part number: 39117-SWA-A00) and it will just plug into the back of the radio. The only thing you will have to do, is extend the wires a little bit, but you can use some crimp connectors instead of soldering. The other end of the harness is a green connector that will connect into the OEM jack. If you do not want to use the harness, what I did previously, I got some free connectors to ends of the old recycled cordless phone batteries (courtesy of my local radioshack), and depinned them. The ends fit well and snug onto the back of the radio after I heatshrinked them. Here is a picture of the ends I am talking about.  Hope this helps.
Hope this helps.
#173
11-11-2012, 02:57 PM
I've installed my everything, and when i plug in the aux cable all the way in the port, the sound only plays through the right speakers.. when i pull it out about 1/8 of an inch or so, it plays through both speakers. any suggestions?
#174
11-20-2012, 02:57 AM

Disclaimer: Do this at your own risk!
Things needed:
- CUI Inc 3.5mm panel mount audio jack w/ 4 connectors (PN: SJ-43502PM)
- 22 gauge electrical wire
- solder hardware or crimping
- drill and 1/4 drill bit
Installation:
First, find the place you want to mount your 3.5mm jack. I chose the same spot as it is in the Sport Fit. I started by drilling a smaller hole first and then working my way to the 1/4" size bit. If you purchase a different 3.5mm jack make sure you check if it is suitable for 1/4" size bit.
Here are pics of the two screws that hold in the little bracket.
Pic of the jack screwed into the bracket.
It was already pretty tight without the nut, but I put it on there anyways just in case. Oh yeah for the BLING factor too!
Second, solder about 5 feet of 22 gauge wire onto each of the 4 connectors on the 3.5mm plug and heatshrink or electric tape them. Mark each cable so you remember which one is which.
Third, remove the headunit and then mount the 3.5mm plug and route the cable up to the back of the headunit.
Fourth, time to solder or crimp the wires coming from the 3.5mm plug to the back of the headunit.
Use Diagram B and connect the following:
3.5mm Jack to Harness
Terminal 1 to B15 (AUX DET)
Terminal 2 to B14 (AUX R)
Terminal 3 to B13 (AUX L)
Terminal 4 to both B3 (AUX SIG GND) and B4 (AUX SHIELD GND)
Here are B13 and B14 soldered and I have the heatshrink ready to be shrunken.
It's a pretty easy installation. It is just time consuming getting the headunit out etc. Let me know if you guys need any more detail.
What it might look like when you are done.
#175
05-24-2013, 11:04 PM

Hi,
first post everyone.. I'm sorry to be digging up such an old thread but I was wondering if someone could send me the pictures to the OP's original guide? Thanks to OP this guide is also really helpful.
first post everyone.. I'm sorry to be digging up such an old thread but I was wondering if someone could send me the pictures to the OP's original guide? Thanks to OP this guide is also really helpful.
#176
02-06-2014, 04:13 PM

Anyone have a DIY with working pictures.. I've been meaning to do this but don't even know where to start. I see there are items you can buy on ebay that connects right in back of the stock head unit. Not sure if those items are legit.
#177
02-06-2014, 07:21 PM
What year is your car?
As you mentioned about the things on ebay. I purchased dupont connecters and will try those to see if they fit. Similar to this 50 PCS Dupont Wire Cable Line 1P 1P PIN Connector 2 54mm 20cm | eBay
#178
02-09-2014, 07:05 PM
So I installed the cable on the weekend. Pretty simple it just takes a bit of time. I don't have any photos during the install however I got some of the finished product.
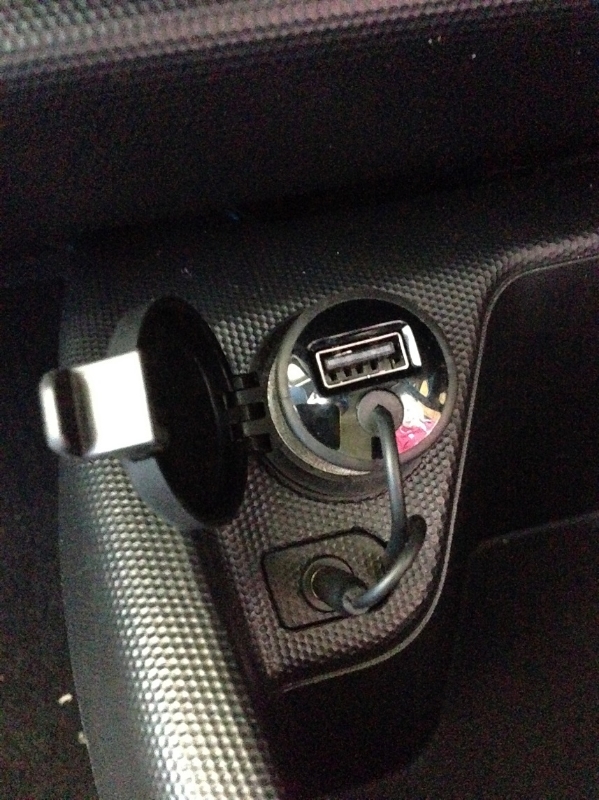
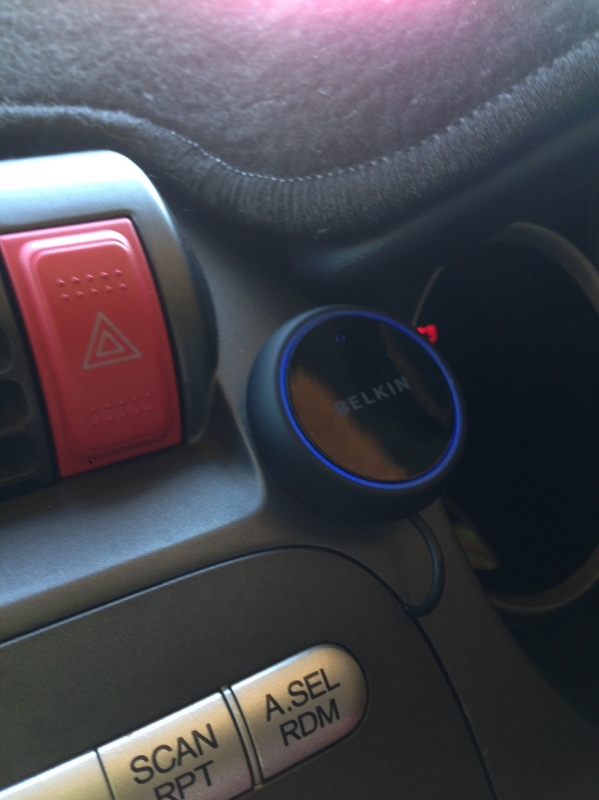
Instead of just installing the aux cable, I installed a bluetooth kit as well which works perfectly. The Belkin Aircast Auto. As you can see in the image, the cord is being squeezed where the radio trim meets the dash trim. This may end up damaging the cable over time but I will take the risk and see how it goes. As for the AUX cable itself, that was the easy part. I just removed the head unit following the many guides that are available. The cable I made was an ethernet cable with a 3.5mm, 3 pole mountable jack on one end and 4 dupont connecters at the other end. These fit perfectly on the pins of the radio. I followed the pinout guide here http://www.hondafitjazz.com/audio.htm as it suited my 2005 Australian model Jazz. I mounted the 3.5mm jack on the small cutout section down by the cigarette plug, just drilled out a hole to suit the jack and mounted it there. As for the bluetooth, I had to cut the connector off, then re-solder the wires after pulling it through the hole as the plug was too big to come through the small cutout hole.
Overall I am very happy with it. It works excellent and the sound quality really is great. If I want to use the AUX plug or cigarette plug I can just unplug the Belkin so it is still versatile. If anyone needs help with the cable or even wants one made up, I may be able to assist just let me know
Last edited by cvas; 02-10-2014 at 02:31 AM.
#180
08-02-2014, 02:34 AM

This looks awfully close to the fit diagram? $8 plug and play
Can any confirm??
http://www.ebay.com/itm/AUX-in-Input-Connector-Audio-Adapter-Cable-For-Honda-Civic-06-13-CRV-08-13-CAR-/181465955701?pt=Motors_Car_Truck_Parts_Accessories&hash=item2a4036bd75&vxp=mtr

matches the stock radio plug #3?

Item description mentions compatible with 06 civic.
Here's the 06 civic radio

Can any confirm??
http://www.ebay.com/itm/AUX-in-Input-Connector-Audio-Adapter-Cable-For-Honda-Civic-06-13-CRV-08-13-CAR-/181465955701?pt=Motors_Car_Truck_Parts_Accessories&hash=item2a4036bd75&vxp=mtr
matches the stock radio plug #3?
Item description mentions compatible with 06 civic.
Here's the 06 civic radio
Last edited by mxl180; 08-02-2014 at 03:13 AM.