
Audio controls on steering wheel?
#21
 09-12-2006, 04:46 AM


Someone that spends his life on FitFreak.net
Join Date: Jan 2006
Location: Ottawa, Ontario
Posts: 1,110
So close, yet no cigar. Was a walk in the park adding the buttons to the steering wheel and adding the 2 wires through the cable reel. Problem was finding what pins to connect the 2 wires too. I tried the ones listed for the 2006 Civic EX with no luck. The resistance values are bang on.
Another minor issue is that the lightig is amber.

More digging is required.

#22
09-12-2006, 08:20 AM

so you are saing that the resistance works at the column? if so you could always use these controls with one of the steering wheel interfaces for an aftermarket head unit. the dash kits are due out any time now.
#23
09-12-2006, 08:59 AM
Someone that spends his life on FitFreak.net
Join Date: Jan 2006
Location: Ottawa, Ontario
Posts: 1,110
I have two wires to the back of the radio, and the resistance is spot on. I might end up going with an aftermarket head unit and interface. I REALLY want to use the buttons. Any tricks for the illumination colour?
BTW, the assembly also included the Bluetooth controls (4 buttons with 1 wire) that would sit between the spokes on the lower left, at approx 7-8 o'clock. I already wired it for future use.
BTW, the assembly also included the Bluetooth controls (4 buttons with 1 wire) that would sit between the spokes on the lower left, at approx 7-8 o'clock. I already wired it for future use.
#25
09-14-2006, 07:01 AM

Someone that Posts too much
Join Date: Apr 2006
Location: Toronto, Ontario, Canada
Posts: 711
#26
09-14-2006, 08:23 AM
Someone that spends his life on FitFreak.net
Join Date: Jan 2006
Location: Ottawa, Ontario
Posts: 1,110
Joe,
The buttons are installed and giving the proper resistance values when pressed. The radio isn't responding though. I connected the remote switch wiring to the same pins that the 2006 Civic EX uses. So either the Fit radio doesn't have the circuitry built in, or they relocated the pin location.
The buttons are installed and giving the proper resistance values when pressed. The radio isn't responding though. I connected the remote switch wiring to the same pins that the 2006 Civic EX uses. So either the Fit radio doesn't have the circuitry built in, or they relocated the pin location.
#27
09-14-2006, 11:02 AM
Someone that Posts too much
Join Date: Apr 2006
Location: Toronto, Ontario, Canada
Posts: 711
that sucks.. hope you get it working, since i want the same mod
hard to change cd tracks when you going 100 mph down the high way
-joe
hard to change cd tracks when you going 100 mph down the high way
-joe
#28
09-19-2006, 06:47 PM

That's looking sweet. I hope you can get it straightned out. I would definately be interested in doing this mod as well. Hope AJ's has ordered some more of the control switches so they'll be on hand when it comes time.

#29
09-19-2006, 07:17 PM
oh crap that looks absoultely amazing!! so u didnt mess w/ the wiring of the cruise control? all u did was feed those 2 wires down the steering reel?
#30
09-21-2006, 12:11 PM
Someone that spends his life on FitFreak.net
Join Date: Jan 2006
Location: Ottawa, Ontario
Posts: 1,110
Disclaimer: The following is provided as a GUIDE ONLY, and neither myself, nor FITFREAK.NET take any responsibility for the outcome of someone else doing the following. You follow these steps at your own risk!
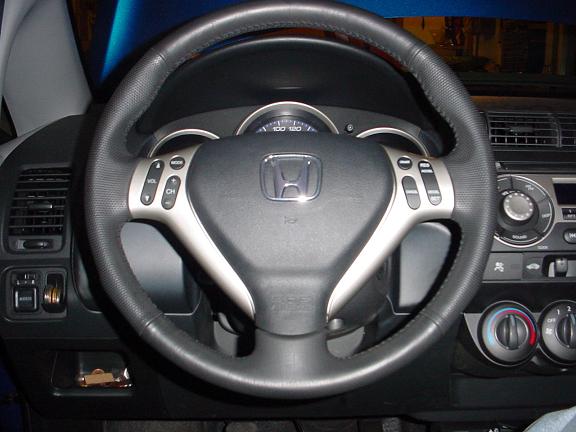
I wanted to create a proper how to at the end, but here are the steps I've done so far. I purchased the steering mounted radio controls (included the bluetooth buttons not shown) and the steering sub-harness from Ben at AJ-Racing.
Since I have a manual Fit Sport, there are 4 available pins in the cable reel. These 4 pins are used on the automatic Fit Sport for the paddle shifters. The other Fits use a different cable reel and have no spare wires.
First thing you need to do is unplug the battery and turn on the lights. This will drain any power stored in any electronic devices in the car.
Then the fun part, removal of the airbag. With the steering pointing down, there's a cover on the steering wheel near the steering column. Remove it and unplug the yellow connector. There are two torx bolts, one on each side. They are at an angle, so don't strip them! Then the airbag can be removed and the horn connector unplugged.
Remove the stock sub-harness.
Three wires from the new sub-harness need to be removed (only two if you don't care for the bluetooth controls) from the harness plug and two wires cut for the back lighting of the buttons, and then added to the existing steering wheel sub-harness.
Start by removing the plastic wire holder. I used a slotted screwdriver (flat tip) to pop both sides of the connector.

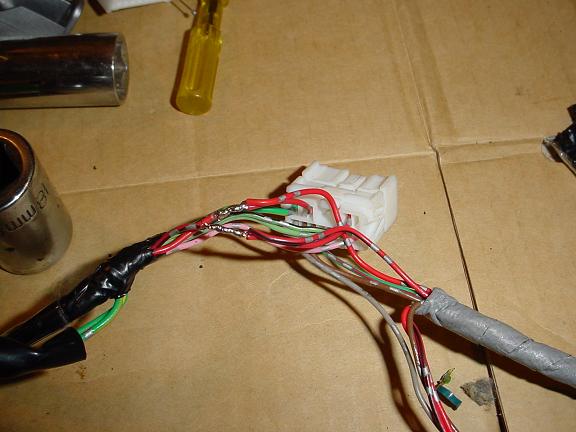
Once that's out, I used a pin to unclip the wire from the plug. If you insert the pin under the connector, you'll eventually release the holder and the wire and connector will slip out. For the steering controls you need the brown wire (common ground) and green/red wire (signal). Remove the grey wire too if you want to wire in the bluetooth buttons. Two or three more wires with connectors will be needed for the other side of the cable reel (identical white plug BTW). You can either remove them now or later.

Here you can see where I spliced and soldered the red and the red/black wire for the button back lighting. I then taped up each wire and the harness to keep all the wires neat and tidy (not shown).
Removing the blank trim on the steering wheel requires removing two phillips bolts from behind (I had the screwdriver pointing to the tilt handle) and one from the front. There's also a rubber holder at the bottom spoke. I then installed the new one in the reverse order.
Here's the sub-harness reinstalled in the steering wheel. I passed the harness under the plastic trim for the stereo controls like the stock one was routed for the cruise control wiring. The circled grey wire goes to the stereo controls and the green one is for the bluetooth controls (not installed, yet ).
).

The other connector for the cable reel is located behind the upper steering column cover. Three phillips screws under the steering column and the rest are pressure clips. Same white plug as pictured above. I placed the wires at the same spot as I did on the steering wheel side of the cable reel.
I ran the two wires for the stereo from that white plug to the back of the radio to find out the damn radio didn't respond to them.
GRRR...
I wanted to create a proper how to at the end, but here are the steps I've done so far. I purchased the steering mounted radio controls (included the bluetooth buttons not shown) and the steering sub-harness from Ben at AJ-Racing.
Since I have a manual Fit Sport, there are 4 available pins in the cable reel. These 4 pins are used on the automatic Fit Sport for the paddle shifters. The other Fits use a different cable reel and have no spare wires.
First thing you need to do is unplug the battery and turn on the lights. This will drain any power stored in any electronic devices in the car.
Then the fun part, removal of the airbag. With the steering pointing down, there's a cover on the steering wheel near the steering column. Remove it and unplug the yellow connector. There are two torx bolts, one on each side. They are at an angle, so don't strip them! Then the airbag can be removed and the horn connector unplugged.
Remove the stock sub-harness.
Three wires from the new sub-harness need to be removed (only two if you don't care for the bluetooth controls) from the harness plug and two wires cut for the back lighting of the buttons, and then added to the existing steering wheel sub-harness.
Start by removing the plastic wire holder. I used a slotted screwdriver (flat tip) to pop both sides of the connector.
Once that's out, I used a pin to unclip the wire from the plug. If you insert the pin under the connector, you'll eventually release the holder and the wire and connector will slip out. For the steering controls you need the brown wire (common ground) and green/red wire (signal). Remove the grey wire too if you want to wire in the bluetooth buttons. Two or three more wires with connectors will be needed for the other side of the cable reel (identical white plug BTW). You can either remove them now or later.
Here you can see where I spliced and soldered the red and the red/black wire for the button back lighting. I then taped up each wire and the harness to keep all the wires neat and tidy (not shown).
Removing the blank trim on the steering wheel requires removing two phillips bolts from behind (I had the screwdriver pointing to the tilt handle) and one from the front. There's also a rubber holder at the bottom spoke. I then installed the new one in the reverse order.
Here's the sub-harness reinstalled in the steering wheel. I passed the harness under the plastic trim for the stereo controls like the stock one was routed for the cruise control wiring. The circled grey wire goes to the stereo controls and the green one is for the bluetooth controls (not installed, yet
).The other connector for the cable reel is located behind the upper steering column cover. Three phillips screws under the steering column and the rest are pressure clips. Same white plug as pictured above. I placed the wires at the same spot as I did on the steering wheel side of the cable reel.
I ran the two wires for the stereo from that white plug to the back of the radio to find out the damn radio didn't respond to them.
GRRR...
#31
09-22-2006, 05:30 AM
I have a UK Sport Factory Head unit that has been removed. This head unit is designed to work the with the steering wheel controls. Would any pics of the rear of the HU be of any help to you guys trying to get the steering wheel controls to work?
Al.
Al.


#34
09-22-2006, 04:11 PM
Someone that spends his life on FitFreak.net
Join Date: Jan 2006
Location: Ottawa, Ontario
Posts: 1,110
Originally Posted by p11wrg
I have a UK Sport Factory Head unit that has been removed. This head unit is designed to work the with the steering wheel controls. Would any pics of the rear of the HU be of any help to you guys trying to get the steering wheel controls to work?
Al.
Al.
Thanks for the pictures.
What frequency range do you guys have in the AM and FM band, as well as the increments?
Honda changed the pin pattern on the black plug on the right. The other two sure look familiar.

#36
09-22-2006, 04:37 PM
***smacks head on desk***
You know what? I had a factory JDM stereo (as above in the pics, but with the manual HVAC controls) and I just chucked it the other day!! I could have sent it to you to help you figure out the controls!!!! D'oh!!!
You know what? I had a factory JDM stereo (as above in the pics, but with the manual HVAC controls) and I just chucked it the other day!! I could have sent it to you to help you figure out the controls!!!! D'oh!!!
#37
09-22-2006, 09:14 PM

Originally Posted by Yuf
***smacks head on desk***
You know what? I had a factory JDM stereo (as above in the pics, but with the manual HVAC controls) and I just chucked it the other day!! I could have sent it to you to help you figure out the controls!!!! D'oh!!!
You know what? I had a factory JDM stereo (as above in the pics, but with the manual HVAC controls) and I just chucked it the other day!! I could have sent it to you to help you figure out the controls!!!! D'oh!!!
 Some poor soul may need it to help others on here!!!
I've done the same before....

#38
09-23-2006, 05:20 AM
Originally Posted by b17gsr
Al,
Thanks for the pictures.
What frequency range do you guys have in the AM and FM band, as well as the increments?
Honda changed the pin pattern on the black plug on the right. The other two sure look familiar.
Thanks for the pictures.
What frequency range do you guys have in the AM and FM band, as well as the increments?
Honda changed the pin pattern on the black plug on the right. The other two sure look familiar.
Al.