
Interior Trim Kit Painting DIY! Zetaproducts!
#1
 07-26-2007, 02:29 PM


Join Date: Jun 2006
Location: La Crescenta, CA
Posts: 2,997
Interior Trim Kit Painting DIY! Zetaproducts!
Well boys n girls, i have another writeup i'm here to post about. Let me start off by saying this is the zetaproducts burlwood dash kit that i got CHEAP from zetaproducts (great company!!!) but i wasn't feeling the wooden look so i decided 2 paint it VBP and do a writeup on it cuz i'm notorious for writeups. 
Disclaimer: The following is provided as a GUIDE ONLY, and neither myself, nor FITFREAK.NET take any responsibility for the outcome of someone else doing the following. You follow these steps at your own risk!
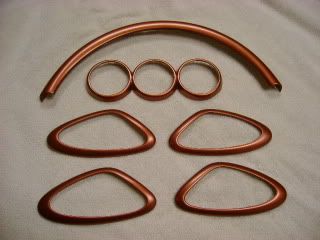
First start off w/ the kit, high quality, real 3m double sided tape, quality service from zeta. Even the wood grain design looked amazing and is ideal if your going for the VIP look.

Link can be found here:
Honda Fit Dash Kit BURLWOOD (CLEARANCE) - FIT_DASH_WOOD
Okay well here is my arsonal of products:


From left to right:
3m rubbing compound (to make the final product super shiney)
Duplicolor acrylic enamel (clear coat to protect the painted finish)
YOU CAN USE EITHER ONE OF THESE 2 PRODUCTS (i used duplicolor to keep the brand constant and b/c it's a primer all in one step) :
Bulldog adhesion promotor (to make the paint stick to the plastic)
Duplicolor adhesion promotor (to make the paint stick to the plastic)
paintscratch.com custom VBP spray paint (BEST quality paint u can buy in a spray paint can)
3m 1500 grit wet/dry sandpaper (to scuff up the surface for paint)
ALL of these products were purchased at your local automotive shop (pep boys, kragen, autozone, etc) except for the paintscratch.com paint.
Lets start:
Take ur wet/dry sandpaper and get 2 a water source. wet the surface of the interior trim kit and sand it down w/ the sandpaper. At first, u feel like it's not doing anything but u'll feel it biting the surface. Do all the pieces, especially the edges (cept for the back w/ the tape on it) and everywhere. This step cannot be skipped b/c u need a surface for the paint to "bite" into and the glossy finish of the burlwood won't work. I choose 1500 grit so u don't scuff up the surface so much u got to prime it after to fill in the scratches.
Once ur done, make sure it's clean! Take it to ur sink and wash it w/ soap n water to make sure u get all the sanded surface off. Once its fully dry, it should look like this:


sexy and dull huh? lol.
Now once all ur pieces are done, transport them to a place where u are goign to paint them. Remember, don't touch the surface, hold it from the bottom (or wear rubber gloves) to avoid getting oil on the surface. If you touch it, go wash it w/ soap n water again.
Elevate the pieces. I used beer cans (no i don't drink) just so they sit higher so i can paint the edges all in one shot.

Here is where the painting comes into play.
Go get ur adhesion promoter and shake the can up real good. Make sure that ANY can u are spraying, it's well shook up (about 2 minutes) so u don't get patches or any weird spraying pattern. Spray the adhesion promotor in 2-3 VERY LIGHT coats. If u get anxious and want to cover it in 1 spray, don't b/c it'll run and ruin ur surface. 2-3 light coats at 3 minutes apart should do it. I took a pic of it but since its clear, u can't see a diff. It looks exactly the same as the above pic, but the pieces are sorta tacky if u touched them (don't touch em! lol).
After 5 minutes of the last coat of adhesion promoter, u can spray ur basecoat (color). Shake the can up REAL GOOD like extra good b/c this is the moment of truth, this is where the color is, how the final product will look like. Again, spray 2-3 LIGHT coats at 10 minute interverals (use a timer if u are getting anxious and want to paint it more). Use a back to forth sweeping action, lightly covering the edge of the last sweep. this is where the elevated surface helps to get the edges. Once u get all the edges n everything, this is what it should look like :


After about 1/2 hour of the base coat to cure, this is where u spray the clear coat to make everything all shiney and protected! Follow the instructions and shake up the can AGAIN a lot. Follow the same directions of the base coat. Spray 2-3 LIGHT coats of clear coat over the surface w/ 10 minute interverals. After that, spray a medium coat after the LAST light coat (a little thicker) so u have a nice surface to buff afterwards.


After u used any spray can, flip it upside down and spray for about 4 seconds until nothing but air comes out. this is to prevent the tip from getting clogged.
THIS IS THE BORING PART!! Once u painted and cleared everything, u have to wait about 7 days ( ) for the clear coat to cure. You could buy the clear coat by paintscratch.com but I found the same paint from autozone for 1/4 of the price.
Now for buffing (this is optional but recommended to make everything shiney).
Take an old CLEAN cotton t-shirt cut it into pieces about 3x3 or 4x4, whatever u are comfortable with. Take some rubbing compount (about a quarter size) and dab it on the cloth and rub it along the surface of the interior pieces. Rubbing compound is like a liquid sandpaper that is super fine. It will remove any scratches or swirl marks, or in this case, make the surface clean. Just rub back and forth in a mini circular motion, always using a new side of the cloth. this is along and boring process, but in the end u will have an interior trim kit that looks amazing!
VOILA!! (this pic is taken b4 clear coat)

Easy huh? This process goes for ANY plastic or fiberglass piece u want to paint. As some of you know, i also helped a group buy for some corrmann eyelids. I used the same process for that and it came out perfect. why pay a body shop to paint such small pieces for a lotta money when u can do it urself?
Hope i educated everybody. Remember, If you guys liked this thread, please give me some rep points. It's simple. On the first post, there is a little gray character in the top right corner of the post (next to the post number and "permalink") click him and click agree. thanks again guys! Oh btw look out for a LOT more writeups from me, especially a BIG one that everybody will want to see .
.
Disclaimer: The following is provided as a GUIDE ONLY, and neither myself, nor FITFREAK.NET take any responsibility for the outcome of someone else doing the following. You follow these steps at your own risk!
First start off w/ the kit, high quality, real 3m double sided tape, quality service from zeta. Even the wood grain design looked amazing and is ideal if your going for the VIP look.
Link can be found here:
Honda Fit Dash Kit BURLWOOD (CLEARANCE) - FIT_DASH_WOOD
Okay well here is my arsonal of products:
From left to right:
3m rubbing compound (to make the final product super shiney)
Duplicolor acrylic enamel (clear coat to protect the painted finish)
YOU CAN USE EITHER ONE OF THESE 2 PRODUCTS (i used duplicolor to keep the brand constant and b/c it's a primer all in one step) :
Bulldog adhesion promotor (to make the paint stick to the plastic)
Duplicolor adhesion promotor (to make the paint stick to the plastic)
paintscratch.com custom VBP spray paint (BEST quality paint u can buy in a spray paint can)
3m 1500 grit wet/dry sandpaper (to scuff up the surface for paint)
ALL of these products were purchased at your local automotive shop (pep boys, kragen, autozone, etc) except for the paintscratch.com paint.
Lets start:
Take ur wet/dry sandpaper and get 2 a water source. wet the surface of the interior trim kit and sand it down w/ the sandpaper. At first, u feel like it's not doing anything but u'll feel it biting the surface. Do all the pieces, especially the edges (cept for the back w/ the tape on it) and everywhere. This step cannot be skipped b/c u need a surface for the paint to "bite" into and the glossy finish of the burlwood won't work. I choose 1500 grit so u don't scuff up the surface so much u got to prime it after to fill in the scratches.
Once ur done, make sure it's clean! Take it to ur sink and wash it w/ soap n water to make sure u get all the sanded surface off. Once its fully dry, it should look like this:
sexy and dull huh? lol.
Now once all ur pieces are done, transport them to a place where u are goign to paint them. Remember, don't touch the surface, hold it from the bottom (or wear rubber gloves) to avoid getting oil on the surface. If you touch it, go wash it w/ soap n water again.
Elevate the pieces. I used beer cans (no i don't drink) just so they sit higher so i can paint the edges all in one shot.
Here is where the painting comes into play.
Go get ur adhesion promoter and shake the can up real good. Make sure that ANY can u are spraying, it's well shook up (about 2 minutes) so u don't get patches or any weird spraying pattern. Spray the adhesion promotor in 2-3 VERY LIGHT coats. If u get anxious and want to cover it in 1 spray, don't b/c it'll run and ruin ur surface. 2-3 light coats at 3 minutes apart should do it. I took a pic of it but since its clear, u can't see a diff. It looks exactly the same as the above pic, but the pieces are sorta tacky if u touched them (don't touch em! lol).
After 5 minutes of the last coat of adhesion promoter, u can spray ur basecoat (color). Shake the can up REAL GOOD like extra good b/c this is the moment of truth, this is where the color is, how the final product will look like. Again, spray 2-3 LIGHT coats at 10 minute interverals (use a timer if u are getting anxious and want to paint it more). Use a back to forth sweeping action, lightly covering the edge of the last sweep. this is where the elevated surface helps to get the edges. Once u get all the edges n everything, this is what it should look like :
After about 1/2 hour of the base coat to cure, this is where u spray the clear coat to make everything all shiney and protected! Follow the instructions and shake up the can AGAIN a lot. Follow the same directions of the base coat. Spray 2-3 LIGHT coats of clear coat over the surface w/ 10 minute interverals. After that, spray a medium coat after the LAST light coat (a little thicker) so u have a nice surface to buff afterwards.
After u used any spray can, flip it upside down and spray for about 4 seconds until nothing but air comes out. this is to prevent the tip from getting clogged.
THIS IS THE BORING PART!! Once u painted and cleared everything, u have to wait about 7 days (
) for the clear coat to cure. You could buy the clear coat by paintscratch.com but I found the same paint from autozone for 1/4 of the price.Now for buffing (this is optional but recommended to make everything shiney).
Take an old CLEAN cotton t-shirt cut it into pieces about 3x3 or 4x4, whatever u are comfortable with. Take some rubbing compount (about a quarter size) and dab it on the cloth and rub it along the surface of the interior pieces. Rubbing compound is like a liquid sandpaper that is super fine. It will remove any scratches or swirl marks, or in this case, make the surface clean. Just rub back and forth in a mini circular motion, always using a new side of the cloth. this is along and boring process, but in the end u will have an interior trim kit that looks amazing!
VOILA!! (this pic is taken b4 clear coat)
Easy huh? This process goes for ANY plastic or fiberglass piece u want to paint. As some of you know, i also helped a group buy for some corrmann eyelids. I used the same process for that and it came out perfect. why pay a body shop to paint such small pieces for a lotta money when u can do it urself?
Hope i educated everybody. Remember, If you guys liked this thread, please give me some rep points. It's simple. On the first post, there is a little gray character in the top right corner of the post (next to the post number and "permalink") click him and click agree. thanks again guys! Oh btw look out for a LOT more writeups from me, especially a BIG one that everybody will want to see
.
Last edited by koolkevin1107; 07-26-2007 at 02:43 PM.
#2
07-26-2007, 02:50 PM
Kevin:
Thanks for the DIY. Do you have any images of the installed pieces?
Hope this helps move some of these kits!
Thanks for the DIY. Do you have any images of the installed pieces?
Hope this helps move some of these kits!

#8
08-11-2007, 10:01 PM
Join Date: May 2007
Location: Stansbury Park, Utah
Posts: 371
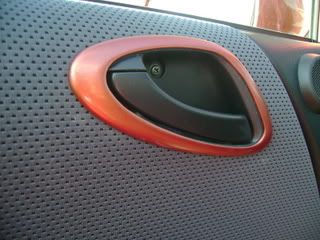
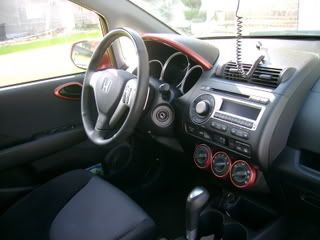
i just painted mine yesterday. they have yet to be rubbed with rubbing compound though, i did do mine the same way koolkevin did his and they turned out very good. This is a very good diy.
#12
08-15-2007, 10:40 PM
Join Date: May 2007
Location: Stansbury Park, Utah
Posts: 371
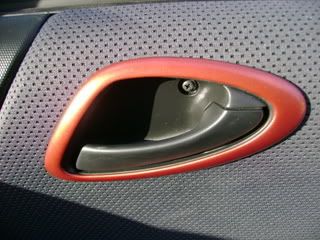
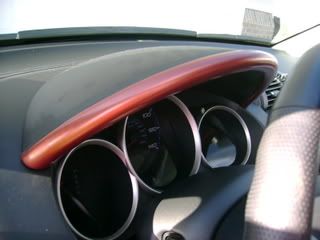
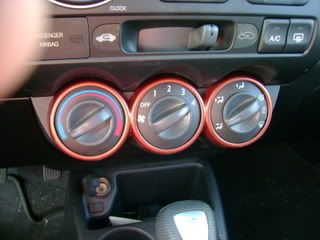
So i couldn't take it any longer and plus i am getting my windows tinted on friday so i figured what the hey, might as well buff them (even though it has not been 7 days, and i dont want to be up all night doing it on friday) and install them and plus i know your all wanting to see them installed, so i did it today here are some pics.
#17
10-31-2007, 09:32 AM
I have a few of the wood kits left. The price is very low.
Honda Fit Dash Kit BURLWOOD (CLEARANCE) - FIT_DASH_WOOD

Honda Fit Dash Kit BURLWOOD (CLEARANCE) - FIT_DASH_WOOD
#18
10-31-2007, 03:41 PM

I just wanna put a good word in for the guys at Zeta - called my order in all the way from the Philippines, got one of these kits, the dead pedal and some wheelskins! The products were top notch and the customer service and communication was FANTASTIC!

#20
11-01-2007, 11:57 AM
I have a few of the wood kits left. The price is very low.
Honda Fit Dash Kit BURLWOOD (CLEARANCE) - FIT_DASH_WOOD
Honda Fit Dash Kit BURLWOOD (CLEARANCE) - FIT_DASH_WOOD