DIY: GE8 LEDs for footwell, key ring, and cupholders
#1
DIY: GE8 LEDs for footwell, key ring, and cupholders
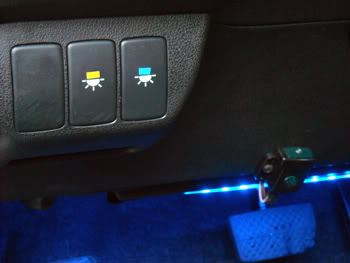
Hi all! I'm fairly new to posting on this forum, but I've been reading up on DIYs here since before I got my TW GE8 in June 2010 =P Anyway, I wanted to give something back, so I wrote this DIY guide on my most recent mod, where I installed my own version of Honda's Ambient Light accessory. This is an improvement to the DIY footwell lights I've seen around in that this adds the OEM Ambient Light switch, so now you can disable the lights if you want and it will initially appear factory, as well as having the dim (or rather, dimmable) footwell lights while driving. At the very least that switch panel will get some use.
Disclaimer: The following is provided as a for educational purposes only, and neither myself, nor fitfreak.net, endorse, recommend, encourage, or bear any responsibility whatsoever for the outcome of someone else following this guide: You are completely responsible for what happens to your own car. Perform at your own risk!
Note: I used two photos from Mr Tyler and chubbykai for this write-up, as their photos are better that what I could get with my old point-and-shoot. Hope you don't mind =)
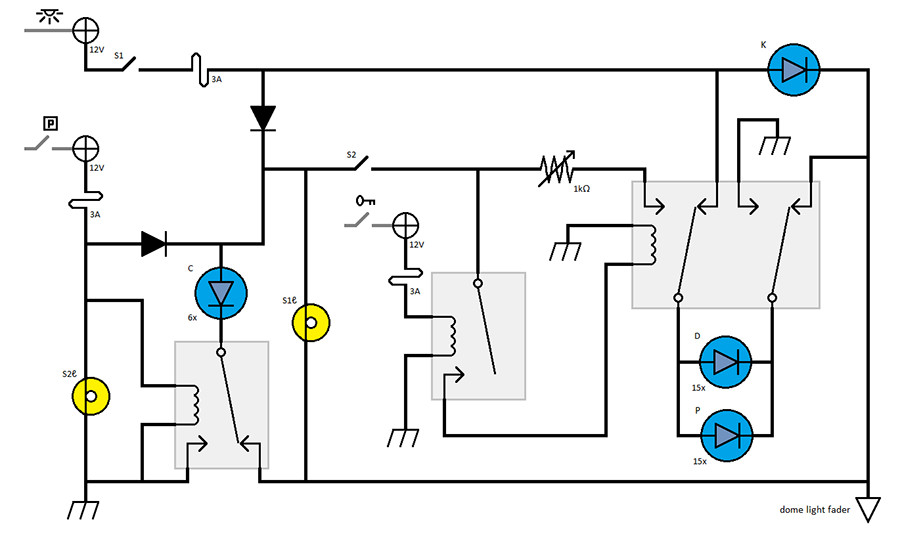
I wanted to have LED lights in the front footwells, around the ignition switch, and over the cupholders, and to have them come on under certain conditions, and to be able to control whether they turn on at all (high standards I have =P ). Some days of designing, hours of wiring, $50 in parts, and one 10A fuse later, this is the circuit I came up with:
And here is the finished product:
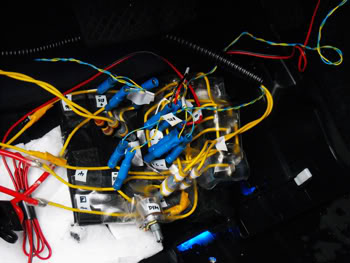
I know it looks messy, but underneath this stale spaghetti on a plastic plate, this is what it looks like:

To connect everything to each other on the board, I used a base of scrap cardboard under a layer of electrical tape and crimped all the wires to the appropriate spots using either a crimper (for the connectors) or my needle-nose pliers (for crimping wires to wires or relay pins). Everything is either crimped or taped down -- no soldering involved -- and it seems to work just fine =D
As it says in the title, there are a total of five switches you can control, each switch having 2 modes, on or off, meaning a total of 2^5 = 32 switch combinations:

Three of the switches already come with the car (the ignition, the parking lights, and the doors), so for "Switch 1" I went to my Honda dealership to ask if they had the P/N for just the Ambient Light switch (P/N 08E10-TA0-1M035), which they surprisingly had in stock and sold to me for for $15 (I know BernardiParts has it for $10, but this was right there). ("Switch 2" I did buy online later).
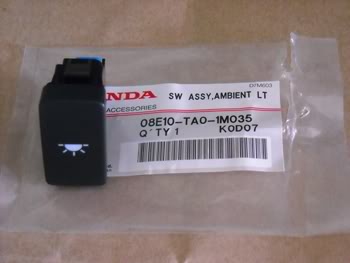
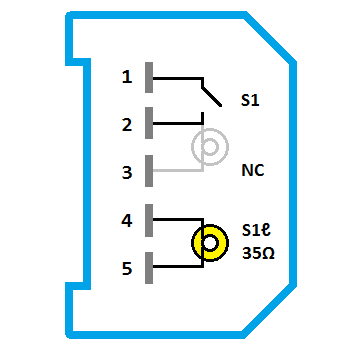
There are five pins, which with my multimeter and a 12V battery source I figured that the top two pins are the actual switch, and the bottom two is the switch's backlight, with the middle pin left unconnected (which would have powered a switched-on indicator light).
By squeezing the two blue tabs together, you can make the securing collar slide off, which makes soldering a whole lot easier.
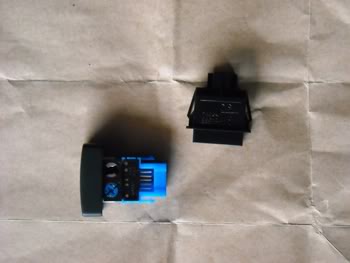
I soldered leads to pins 1, 2, 4, and 5, terminated with quick-disconnectors, and replaced the switch blanks with the new switches. Then I filled each switch with silicone to make sure that they don't come out (again).
To make the lights to come on when I open the door, I used the dome light as one of the power sources. This is relatively easy to find: it's the only connector with a blue and a pink wire in it.
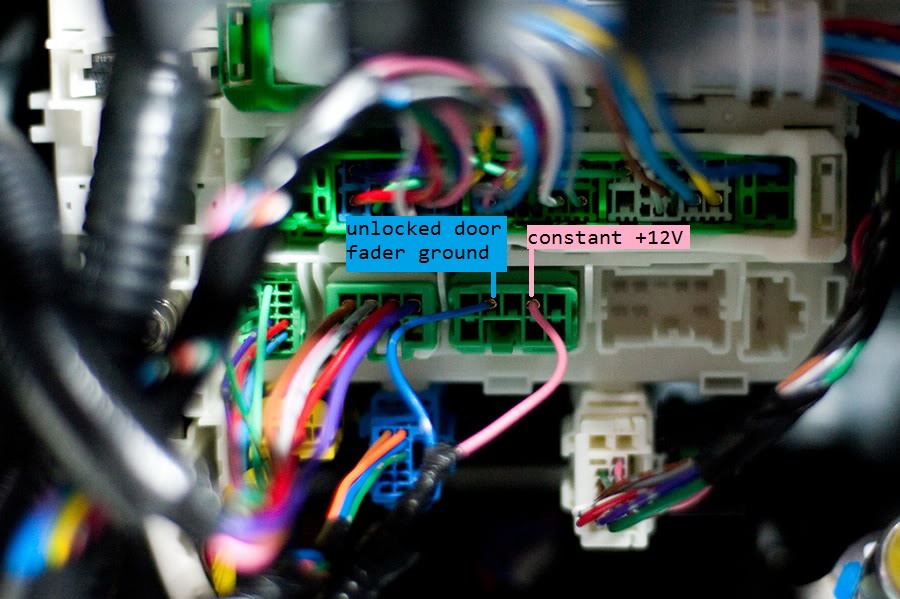
Original photo by Mr Tyler
I thank him for the basic idea
Pink is hot and blue is not.
Pink is always hot, so don't accidentally ground it and fry the 10A Back Up fuse like I did. Blue is the dome light dimmer ground, which automatically dims after all the doors are closed and the car is locked or after 30 seconds unlocked.
I also wanted to have illumination when the parking lights came on, so I tapped into there as well.
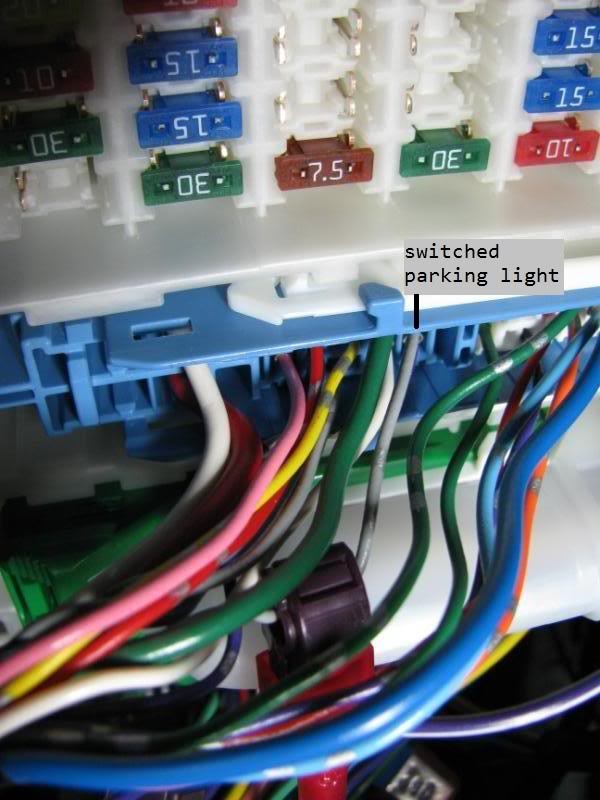
Original photo by chubbykai
Because tapping into the parking lights completely slaved the footwell lights, they used to blink every time I remotely lock and unlock the car. To fix this I put in a third tap to the ignition and relayed it, so the dimmer won't activate unless the car is on. The ignition is the purple wire next to the dome light connector:

same Mr Tyler photo, different pointer
To tap into the dome light, ignition, and parking lights, I used Posi-Taps on the appropriate wires.
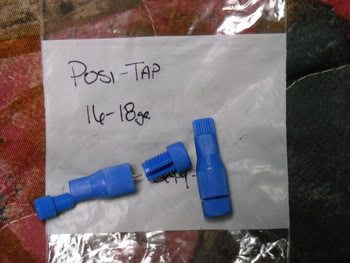
Some of the wires put up a little fight getting successfully tapped into, but once in I feel those taps won't be coming out, and it's easy to change out the lead wires without having to remove the tap itself.
For the chassis ground I just took a forked terminal and secured it under one of the bolts behind the brake pedal.
For the lights themselves, I picked up a $20 pair of stick-on flexible LED bars that can be cut to size from Autozone. For my mod, I cut off the last three LEDs off the ends and placed them over the cupholders. I soldered really thin speaker wire as the leads to avoid any drilling. The center panel is a PITA to remove, it took a bent paper clip and a pair of pliers to pry it off (it opens from the bottom). Here's what they look like installed:
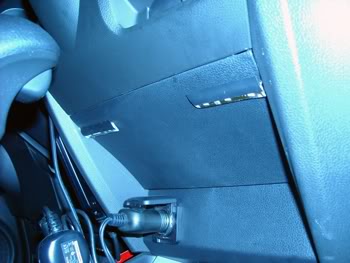
The electrical tape is a makeshift shield to stop blinding those in the back seat.
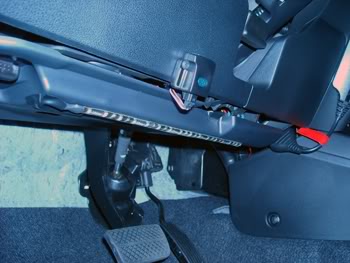
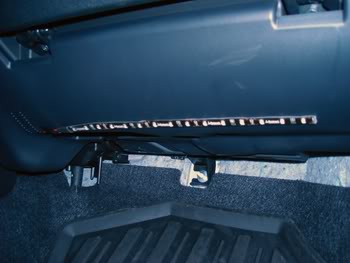
The footwell lights simply stuck on under the dash, and I routed the wires through the preexisting holes in the panels.
Of course, I could have just modified an Ambient Light harness, but that's no fun. Besides, I had a large spool of 16 gauge wire and 5 rolls of electrical tape lying around with nothing better to do =P
And here is the final product...
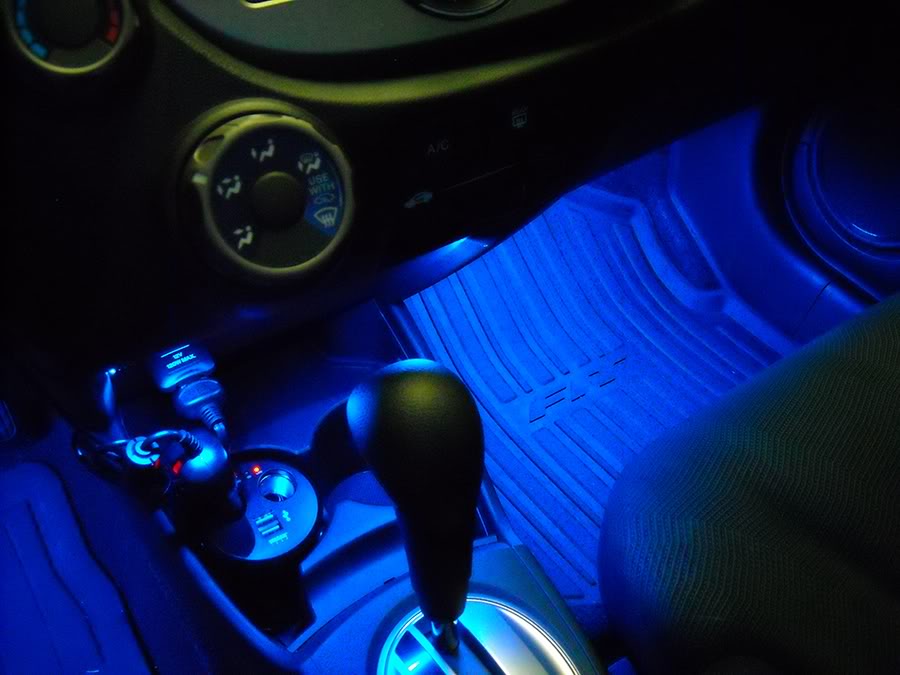
My buddies have been surprised that I have such a system in such an otherwise unluxurious vehicle, and that I actually did all the work myself. I myself am just happy that there is more light in the cabin to 1) find stuff in the footwells in the dark and 2) better stay awake driving at night from the extra light (I set the dimmer to not be overwhelming while driving). At first, I was concerned that this mod could somehow void my warranty, but unless this sub-ampere system somehow destroys the entire car, the warranty is safe. Besides, I've already put 15k miles in half a year (needs of the Army), so it's not like I'll be missing out anyway =P
Next plans: install footwell lights in the rear footwells, install additional trunk lights, create a glove compartment lighting system, and create a rear fog light system. I guess you could say I'm obsessed with illumination...

Disclaimer: The following is provided as a for educational purposes only, and neither myself, nor fitfreak.net, endorse, recommend, encourage, or bear any responsibility whatsoever for the outcome of someone else following this guide: You are completely responsible for what happens to your own car. Perform at your own risk!
Note: I used two photos from Mr Tyler and chubbykai for this write-up, as their photos are better that what I could get with my old point-and-shoot. Hope you don't mind =)
I wanted to have LED lights in the front footwells, around the ignition switch, and over the cupholders, and to have them come on under certain conditions, and to be able to control whether they turn on at all (high standards I have =P ). Some days of designing, hours of wiring, $50 in parts, and one 10A fuse later, this is the circuit I came up with:

And here is the finished product:

I know it looks messy, but underneath this stale spaghetti on a plastic plate, this is what it looks like:

To connect everything to each other on the board, I used a base of scrap cardboard under a layer of electrical tape and crimped all the wires to the appropriate spots using either a crimper (for the connectors) or my needle-nose pliers (for crimping wires to wires or relay pins). Everything is either crimped or taped down -- no soldering involved -- and it seems to work just fine =D
As it says in the title, there are a total of five switches you can control, each switch having 2 modes, on or off, meaning a total of 2^5 = 32 switch combinations:

Three of the switches already come with the car (the ignition, the parking lights, and the doors), so for "Switch 1" I went to my Honda dealership to ask if they had the P/N for just the Ambient Light switch (P/N 08E10-TA0-1M035), which they surprisingly had in stock and sold to me for for $15 (I know BernardiParts has it for $10, but this was right there). ("Switch 2" I did buy online later).

There are five pins, which with my multimeter and a 12V battery source I figured that the top two pins are the actual switch, and the bottom two is the switch's backlight, with the middle pin left unconnected (which would have powered a switched-on indicator light).

By squeezing the two blue tabs together, you can make the securing collar slide off, which makes soldering a whole lot easier.

I soldered leads to pins 1, 2, 4, and 5, terminated with quick-disconnectors, and replaced the switch blanks with the new switches. Then I filled each switch with silicone to make sure that they don't come out (again).
To make the lights to come on when I open the door, I used the dome light as one of the power sources. This is relatively easy to find: it's the only connector with a blue and a pink wire in it.

Original photo by Mr Tyler
I thank him for the basic idea
Pink is hot and blue is not.
Pink is always hot, so don't accidentally ground it and fry the 10A Back Up fuse like I did. Blue is the dome light dimmer ground, which automatically dims after all the doors are closed and the car is locked or after 30 seconds unlocked.
I also wanted to have illumination when the parking lights came on, so I tapped into there as well.

Original photo by chubbykai
Because tapping into the parking lights completely slaved the footwell lights, they used to blink every time I remotely lock and unlock the car. To fix this I put in a third tap to the ignition and relayed it, so the dimmer won't activate unless the car is on. The ignition is the purple wire next to the dome light connector:

same Mr Tyler photo, different pointer
To tap into the dome light, ignition, and parking lights, I used Posi-Taps on the appropriate wires.

Some of the wires put up a little fight getting successfully tapped into, but once in I feel those taps won't be coming out, and it's easy to change out the lead wires without having to remove the tap itself.
For the chassis ground I just took a forked terminal and secured it under one of the bolts behind the brake pedal.
For the lights themselves, I picked up a $20 pair of stick-on flexible LED bars that can be cut to size from Autozone. For my mod, I cut off the last three LEDs off the ends and placed them over the cupholders. I soldered really thin speaker wire as the leads to avoid any drilling. The center panel is a PITA to remove, it took a bent paper clip and a pair of pliers to pry it off (it opens from the bottom). Here's what they look like installed:

The electrical tape is a makeshift shield to stop blinding those in the back seat.
The footwell lights simply stuck on under the dash, and I routed the wires through the preexisting holes in the panels.


Of course, I could have just modified an Ambient Light harness, but that's no fun. Besides, I had a large spool of 16 gauge wire and 5 rolls of electrical tape lying around with nothing better to do =P
And here is the final product...

My buddies have been surprised that I have such a system in such an otherwise unluxurious vehicle, and that I actually did all the work myself. I myself am just happy that there is more light in the cabin to 1) find stuff in the footwells in the dark and 2) better stay awake driving at night from the extra light (I set the dimmer to not be overwhelming while driving). At first, I was concerned that this mod could somehow void my warranty, but unless this sub-ampere system somehow destroys the entire car, the warranty is safe. Besides, I've already put 15k miles in half a year (needs of the Army), so it's not like I'll be missing out anyway =P
Next plans: install footwell lights in the rear footwells, install additional trunk lights, create a glove compartment lighting system, and create a rear fog light system. I guess you could say I'm obsessed with illumination...
Last edited by flip619; 01-11-2011 at 05:20 PM. Reason: link changes
#9
blue, i know you don't need this anymore, but I have a solution for anyone else that is looking to do this with the OEM switch! let me know if anyone needs the pigtail, I had to order 10 when I bought mine, so I'll be selling probably 8 of them (wanna keep a backup for another project!)
Thread
Thread Starter
Forum
Replies
Last Post
Zalthras
Fit Interior & Exterior Illumination
70
01-05-2021 11:17 PM
Mr Tyler
Fit Interior & Exterior Illumination
9
11-23-2013 03:58 PM


