
Megan Header Install
#1
 07-21-2007, 10:34 PM

Megan Header Install
This my experience replacing the header for the Honda Fit. Note this is an experience that I want to share with and in any way instructions. There were some bumps in the road, but overall fairly easy to do and took me an hour and a half for being my first header install.
1. Remove the heat shield. Held by 3 10mm bolts. Can be accessed thru the top of the engine compartment.
2. Loosen the 5 bolts connected to the engine. All are 14mm, but the bottom three are bolts and top two are nuts.
- I loosened them from the top, but found it easier if I removed them from the bottom.
- To access the header from the bottom, the protector cover for the front axle must be removed using 10mm. Looks like a black U shaped protector.
3. Still from the bottom loosen the bracket connecting to the header using a 12mm. Loosen at the header as well as the bolt connected to the transmission.
4. With 12 mm remove the bolts with springs connecting the downpipe and the header. I had a air rachet which is soo handy.
5. Unclip the connection for the O2 sensor. To disconnect is to push down on the bottom part of the clip. The top part of the clip disconnects it from the bracket.
6. While moving out the downpipe and some wiggle-ing, it was out. My friend was able to squeeze it out from the top.
7. Put the new header back reverse order, except the heat shield.
The Megan header I felt more the mid range between 3000 to 4500 rpms. I still have the remaining stock system and no aftermarket intake either. Just have some patience and you�ll get it done.
Here are some pics.
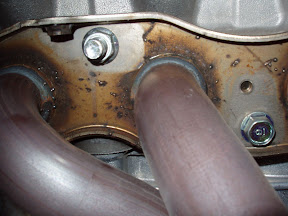
Here are two of the 5 bolts to be removed from the block. Top one is a nut and bottom one is a bolt.
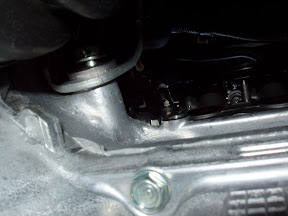
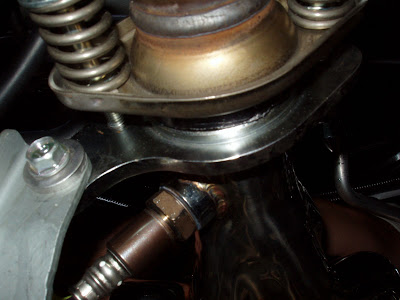
Bottom bracket that supports the header that bolts onto the transmission.
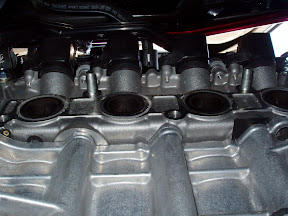
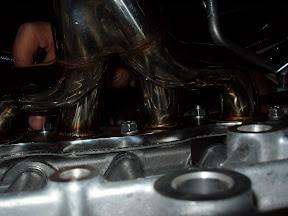
Here is the pic of the engine without any exhaust manifold. You see the two studs remaining in the block.
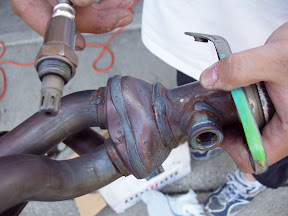
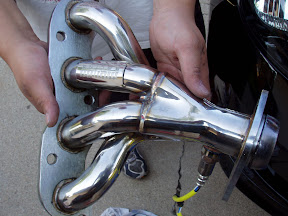
Out with the old
In with the new
Bottom bracket connected to the new header.

Tightening up in a star motion.
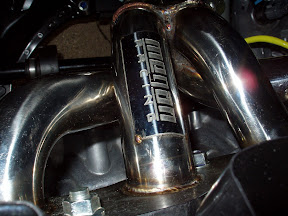
Finished product
Enjoy. I don't have pics of the O2 sensor clip or the protector the covers the axel. Have fun with it.
1. Remove the heat shield. Held by 3 10mm bolts. Can be accessed thru the top of the engine compartment.
2. Loosen the 5 bolts connected to the engine. All are 14mm, but the bottom three are bolts and top two are nuts.
- I loosened them from the top, but found it easier if I removed them from the bottom.
- To access the header from the bottom, the protector cover for the front axle must be removed using 10mm. Looks like a black U shaped protector.
3. Still from the bottom loosen the bracket connecting to the header using a 12mm. Loosen at the header as well as the bolt connected to the transmission.
4. With 12 mm remove the bolts with springs connecting the downpipe and the header. I had a air rachet which is soo handy.
5. Unclip the connection for the O2 sensor. To disconnect is to push down on the bottom part of the clip. The top part of the clip disconnects it from the bracket.
6. While moving out the downpipe and some wiggle-ing, it was out. My friend was able to squeeze it out from the top.
7. Put the new header back reverse order, except the heat shield.
The Megan header I felt more the mid range between 3000 to 4500 rpms. I still have the remaining stock system and no aftermarket intake either. Just have some patience and you�ll get it done.
Here are some pics.
Here are two of the 5 bolts to be removed from the block. Top one is a nut and bottom one is a bolt.
Bottom bracket that supports the header that bolts onto the transmission.
Here is the pic of the engine without any exhaust manifold. You see the two studs remaining in the block.
Out with the old
In with the new
Bottom bracket connected to the new header.
Tightening up in a star motion.
Finished product
Enjoy. I don't have pics of the O2 sensor clip or the protector the covers the axel. Have fun with it.


#4
07-22-2007, 01:49 AM
No leaks
I have found no leaks. I bought the header after I found out there were leaks around the O2 bung. I just tried it out and see what happens. So far no leaks.
As far as sound, not much difference from stock. Just a tad throatier, but really can't tell. If I had some kind of axle back or cat back exhaust, maybe the sounds might go up.
As far as sound, not much difference from stock. Just a tad throatier, but really can't tell. If I had some kind of axle back or cat back exhaust, maybe the sounds might go up.
#5
07-22-2007, 05:31 AM

put the car under stress. I have dc headers that i installed the other day. I didn't feel a huge gain, but tonight i was driving home w/ like 4 guys in the car and HOLY CRAP u can feel the power!! it's not slow when the car is under stress w/ headers.

#9
08-06-2007, 10:37 AM
pickup and acceleration
The pick up is better and the passing acceleration is good too. Nothing too drastic, but could feel it. Also I found that if I floor the pedal, the acceleration is not too good. I found it better to keep the gas pedal in the middle to get the best acceleration. Kinda wierd, but maybe its because I have a stock intake and the engine is not getting enough air. Overall I like it.
#12
08-11-2007, 09:03 PM
I just ordered my Megan Axle Back Exhaust
Since I couldn't find any info on it here I decided to bite the bullet and buy it since found a good price on it. I should be getting it sometime this week. Can't wait to get it on!
Last edited by OCKC; 09-04-2007 at 10:50 AM.

#16
09-20-2007, 07:18 PM
This my experience replacing the header for the Honda Fit. Note this is an experience that I want to share with and in any way instructions. There were some bumps in the road, but overall fairly easy to do and took me an hour and a half for being my first header install.
1. Remove the heat shield. Held by 3 10mm bolts. Can be accessed thru the top of the engine compartment.
2. Loosen the 5 bolts connected to the engine. All are 14mm, but the bottom three are bolts and top two are nuts.
- I loosened them from the top, but found it easier if I removed them from the bottom.
- To access the header from the bottom, the protector cover for the front axle must be removed using 10mm. Looks like a black U shaped protector.
3. Still from the bottom loosen the bracket connecting to the header using a 12mm. Loosen at the header as well as the bolt connected to the transmission.
4. With 12 mm remove the bolts with springs connecting the downpipe and the header. I had a air rachet which is soo handy.
5. Unclip the connection for the O2 sensor. To disconnect is to push down on the bottom part of the clip. The top part of the clip disconnects it from the bracket.
6. While moving out the downpipe and some wiggle-ing, it was out. My friend was able to squeeze it out from the top.
7. Put the new header back reverse order, except the heat shield.
The Megan header I felt more the mid range between 3000 to 4500 rpms. I still have the remaining stock system and no aftermarket intake either. Just have some patience and you�ll get it done.
Here are some pics.
Here are two of the 5 bolts to be removed from the block. Top one is a nut and bottom one is a bolt.
Enjoy. I don't have pics of the O2 sensor clip or the protector the covers the axel. Have fun with it.
 I am installing my header this upcoming weekend. I have a quick technical question, what should the header bolts be torqued to? Also if anybody knows, what should the rest of the exhuast system bolt ups be torqued to?
#17
09-21-2007, 10:32 AM
torque settings???
Not really sure what they are. I know they shouldn't be over 60lbs. I think around 35 to 45lbs. But the hard thing for me was to fit my torque rachet in there. So some of them I tightened by feel.
#18
09-21-2007, 02:39 PM
Hey thanks for the quick responce!
I am guessing most people who are putting them on are doing it by feel. The only concern I have with doing that is that if I don't torque it enough, it won't put enough compression on the metal gasket and I might get some tiny leaks. Then again I guess as long as I tighten it up evenly it should seal up nicely anyway.
A friend of mine downloaded an in-depth service manual for the Fit, I might stop by there before I install my headers and browse through it to see if I can find the reccomended torque specs. If I do I will post them up.
#19
09-21-2007, 05:29 PM
just ordered a megan header. after reading some feedback in this forum i called them and voiced my concerns. they said they were aware of some faulty headers and had purchased new welders and the problem has been resolved. hope so.. mine should be here next week!
#20
09-21-2007, 10:45 PM
Any sound clips? Even if all you have is the Header I'd like to get a feal for the sound.
I've got the Megan Axle-Back, probably will get the headers soon but I don't want it to be too loud or ricey, the axle-back is just about perfect as far as sound goes, but the little extra power would be nice.
I've got the Megan Axle-Back, probably will get the headers soon but I don't want it to be too loud or ricey, the axle-back is just about perfect as far as sound goes, but the little extra power would be nice.