
Quang's turbo build CHU!!!


#22
 01-10-2009, 09:25 PM


he's just going drill and tap the oil pan from my understanding.
#24
01-10-2009, 10:36 PM
Rep to u man! I love all ur DIY fab's, this one and the rear disc conversion u did a while ago. Continue updating all the time and show pix.
BTW i have the same welder you bought from harbor Freight. I LOVE it, use it all the time.
Oh btw i think he said he's going to use it for the charge pipes, not for the exhaust manifold and downpipe cuz it wouldn't hold up.
BTW i have the same welder you bought from harbor Freight. I LOVE it, use it all the time.
Oh btw i think he said he's going to use it for the charge pipes, not for the exhaust manifold and downpipe cuz it wouldn't hold up.
#25
01-10-2009, 11:16 PM
I didn't even tap mine.. I drilled it to the size spec'd in my kit, put a threaded barbed fitting in with washers on both sides, tightened the F!CK out of it with some permanent loktite, and called it good. Hasn't leaked yet...
#26
01-11-2009, 09:44 PM
yeah the welder i picked up is mainly for tacking things together for mock up. im going to have someone local to me tig weld the manifold and maybe the downpipe.
i have always felt iffy on bulk-head fittings so thats why im drilling and tapping.
ill be back to my house on tuesday so ill maybe have some work done to upate you guys.
later!
i have always felt iffy on bulk-head fittings so thats why im drilling and tapping.
ill be back to my house on tuesday so ill maybe have some work done to upate you guys.
later!
#27
01-24-2009, 02:48 AM
yeah the welder i picked up is mainly for tacking things together for mock up. im going to have someone local to me tig weld the manifold and maybe the downpipe.
i have always felt iffy on bulk-head fittings so thats why im drilling and tapping.
ill be back to my house on tuesday so ill maybe have some work done to upate you guys.
later!
i have always felt iffy on bulk-head fittings so thats why im drilling and tapping.
ill be back to my house on tuesday so ill maybe have some work done to upate you guys.
later!
#28
01-27-2009, 03:47 AM
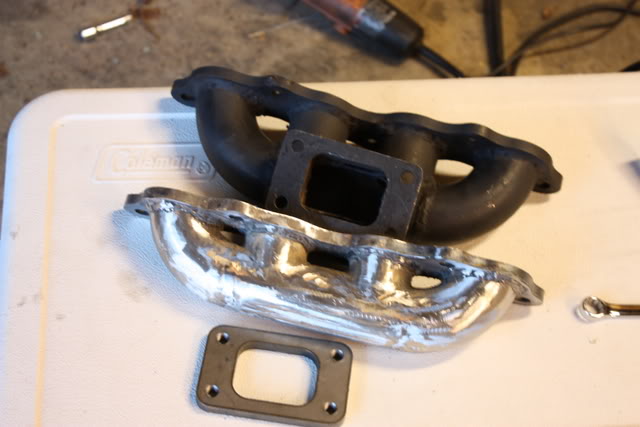
yeah sorry for lagging so bad, but the guy that i was gonna use to tig up my manifold was lagging out on me, so i said screw it, and i welded it up myself. i have most of it welded up the only thing i have left to do on it is figure out turbo placement and weld on the t3 flange.
after that i have to weld up the down pipe and finish some odd and ends and i should be ready to go
pics should be posted soon.
after that i have to weld up the down pipe and finish some odd and ends and i should be ready to go
pics should be posted soon.
#29
01-27-2009, 08:34 AM

do you have any recomendatiosn for running the IC piping past the washer bottle area? what size pipe did you use and is there any rubbing (or close to it)?
its a VERY tight area.
its a VERY tight area.
#30
01-27-2009, 09:42 AM
hahaha that brings back install day memories...
The T1R kit came with a washer bottle, but it was nearly (ok, exactly as near as makes any difference) the same as the stock one. My buddy used a torch to heat up the plastic and dent in the top of it to make more clearance. That didn't work well.
So the way I've got it now , it's bungee corded (yes, bungee corded) to the frame at an odd angle, and the filler neck is extended with an old piece of garden hose and some duct tape.
I can't believe it sometimes, but it works!
#31
01-27-2009, 09:47 AM
hahaha that brings back install day memories...
The T1R kit came with a washer bottle, but it was nearly (ok, exactly as near as makes any difference) the same as the stock one. My buddy used a torch to heat up the plastic and dent in the top of it to make more clearance. That didn't work well.
So the way I've got it now , it's bungee corded (yes, bungee corded) to the frame at an odd angle, and the filler neck is extended with an old piece of garden hose and some duct tape.
I can't believe it sometimes, but it works!
The T1R kit came with a washer bottle, but it was nearly (ok, exactly as near as makes any difference) the same as the stock one. My buddy used a torch to heat up the plastic and dent in the top of it to make more clearance. That didn't work well.
So the way I've got it now , it's bungee corded (yes, bungee corded) to the frame at an odd angle, and the filler neck is extended with an old piece of garden hose and some duct tape.
I can't believe it sometimes, but it works!
the problem is just that i feel that area is very small to run piping...but i guess 2" pipe fits without a problem? no rubbing on the metal?
and sorry for the threadjack...
Last edited by NIGHTHAWKSI; 01-27-2009 at 09:52 AM.
#32
01-27-2009, 09:51 AM
I don't have any rubbing that I can detect on my intercooler pipes. My exhaust, however, is another story entirely... Damn heatshield hangers ruin my day.
#35
01-27-2009, 02:34 PM
well i used a 90degree silicon elbow through that section and made it work just fine.
if i had to do it again, id run it under the car would have been much easier
if i had to do it again, id run it under the car would have been much easier
#36
01-27-2009, 02:55 PM
last night i was sitting there just staring at the passenger side of the motor trying to figure out how to route it and it seems there is somthign in the way everywhere...
the pullies and wheel well are at the bottom passenger side. i could cut out some of the wheel well, but i think thats just asking for trouble...
if i go any lower than the pulley/wheel well, the pipe will be below the level of the splash shield, i hit that all the time since im lowered...the pipe would be destroyed quickly.
im going to jack the car up and look at it again tonight. if i cant figure out anything easier, im just goign to run 2" pipe whe same way as the t1r and hks kits do.
#39
02-17-2009, 12:20 AM
just posting a pic of what i have gotten done up till doday. school has been pretty hectic, with work and other things i have to take care of, it's hard to find time to work on the project. hmmm i really dont know if i should do a topmount turbo or bottom mount...
with a topmount it's easier to route the dp and charge pipe, but i dont want to run into heat issues with the coil packs and the lines by the firewall.
do you guys think a nice heat shield will solve heat issues?
#40
02-21-2009, 01:10 AM
Top mount it is then! 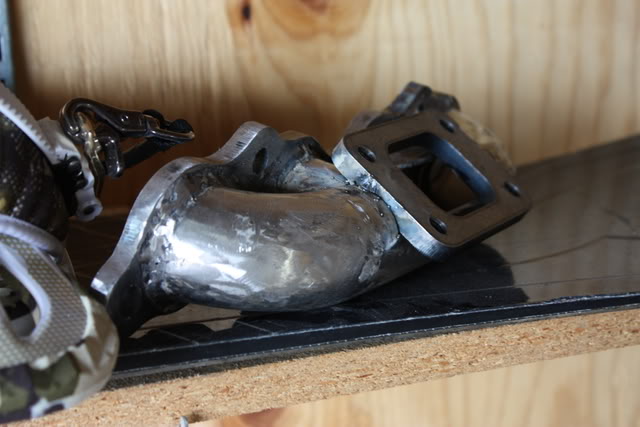
I have exams all next week so ill try to work on it sometime next weekend.
I have exams all next week so ill try to work on it sometime next weekend.