
anyone installed Mugen Visor
#121
 07-25-2008, 12:22 AM


Mine were easy to install, although being that everything was in Japanese I unfortunately smelled the pack of mystery cleaner while trying to figure out what it was.... it knocked me on my ass like I had been hit with a hammer 
So... here is my free tip
1) Do not smell or breath the little packet of adhesive cleaner/prep or whatever it is.
So... here is my free tip
1) Do not smell or breath the little packet of adhesive cleaner/prep or whatever it is.
#122
12-26-2008, 01:14 PM
Anyone have a guide on uninstalling and re-positioning? I put them on wrong originally, they aren't high enough on the door and the right side isn't even ;/
#123
09-21-2009, 02:44 PM
just installed a set on my ge. i would do one side at a time, that way you can line them up and adjust as needed. note: this is for genuine Mugen Ventilated Visors (not Mugen "style").
-first, install the brackets (or buraketto, LOL) in the appropriate areas with the flush side facing the visor.
-then, prep each individual piece of double stick tape with a 2 in. piece of masking tape (to aid in removal of plastic lining).
-roll down the corresponding window and pull down the rubber lining that seats the window until only the top two corners are seated.
-next, prep the area with isopropyl alcohol and 3M PAC Primer and position the visor with brackets clipping onto the inside of the door (so it's positioned under the rubber lining).
-now push lining back into gaps starting from the corners and making your way in.
-roll up the windows and position the visor so it's 2 mm. from the top and 3 mm. from the side where the doors meet.
-follow the above process for all windows.
-pull the masking tape and remove the plastic lining for the double stick tape.
-finally, press firmly along the edges of the visor to create a strong adhesion.
your end product should come out like this...
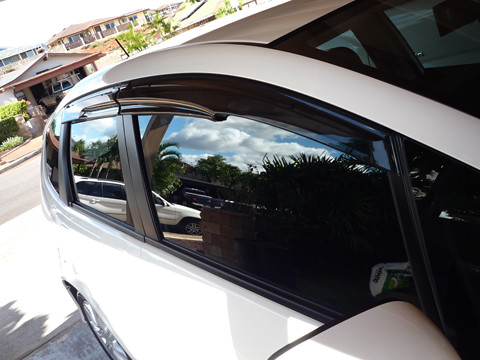
note: this process is not verbatim from the installation guide. i followed the measurement and improvised a few steps with help from this forum. i hope that this procedure aids in any future installations. hopefully it will persuade some 50/50 buyers to go with the genuine stuff. not only is it mugen and made in japan, but it's functional as well. i got mine from www.jhpusa.com and it took about 30 min. to install by myself. thanks for reading!
-first, install the brackets (or buraketto, LOL) in the appropriate areas with the flush side facing the visor.
-then, prep each individual piece of double stick tape with a 2 in. piece of masking tape (to aid in removal of plastic lining).
-roll down the corresponding window and pull down the rubber lining that seats the window until only the top two corners are seated.
-next, prep the area with isopropyl alcohol and 3M PAC Primer and position the visor with brackets clipping onto the inside of the door (so it's positioned under the rubber lining).
-now push lining back into gaps starting from the corners and making your way in.
-roll up the windows and position the visor so it's 2 mm. from the top and 3 mm. from the side where the doors meet.
-follow the above process for all windows.
-pull the masking tape and remove the plastic lining for the double stick tape.
-finally, press firmly along the edges of the visor to create a strong adhesion.
your end product should come out like this...
note: this process is not verbatim from the installation guide. i followed the measurement and improvised a few steps with help from this forum. i hope that this procedure aids in any future installations. hopefully it will persuade some 50/50 buyers to go with the genuine stuff. not only is it mugen and made in japan, but it's functional as well. i got mine from www.jhpusa.com and it took about 30 min. to install by myself. thanks for reading!


#128
04-05-2012, 05:35 PM

Hope this thread isn't dead....
Looked on king motorsports but the price was 169. Not 149? Is there a Fit freak discount I'm missing?
Or even better, has anyone found a great price for them with free shipping?
Looked on king motorsports but the price was 169. Not 149? Is there a Fit freak discount I'm missing?
Or even better, has anyone found a great price for them with free shipping?
#129
04-05-2012, 05:45 PM
I think this thread IS dead except to anyone getting emails that someone has posted. I don't even remember where I ordered mine from or how much I paid, but I don't remember them being THAT expensive!! Makes me want to further explore transferring mine to the new Fit when the day comes - if they'll fit! You may want to start a new thread with your question....?
#130
04-05-2012, 06:00 PM
I think this thread IS dead except to anyone getting emails that someone has posted. I don't even remember where I ordered mine from or how much I paid, but I don't remember them being THAT expensive!! Makes me want to further explore transferring mine to the new Fit when the day comes - if they'll fit! You may want to start a new thread with your question....?
Thanks again I'll start a new thread or maybe search for another one that's still alive haha

#131
04-06-2012, 07:03 PM
I think this thread IS dead except to anyone getting emails that someone has posted. I don't even remember where I ordered mine from or how much I paid, but I don't remember them being THAT expensive!! Makes me want to further explore transferring mine to the new Fit when the day comes - if they'll fit! You may want to start a new thread with your question....?
Hey Squirrely - I haven't seen you on here in a while and just was surfing and found your post. Hope that all is well! You still got your Fit! Yeah! I
still have my 2007 and hope to for many more years. Kings Motor Sports does list the Mugen visors as 2007 and then the 2009 and up. So there may be some difference since they have listed them depending on the year of your car.

#132
04-11-2014, 07:07 PM

Looks like prices have gone way up for the Mugen visors. I got mine from someone on another forum for $120. I have yet to put them on but will try to get to it this weekend using all the tips in this thread. Thank you in advance to those who have posted helpful hints and for pictures that don't go to dead links.

Thread
Thread Starter
Forum
Replies
Last Post
nfs_freak
For Sale / Want To Buy / Classified Ads for USED Fit Items
0
05-07-2009 10:37 AM
urbnzeus
Fit DIY: Repair & Maintenance
2
03-24-2008 09:26 AM
fit, guards, honda, install, installation, instructions, mugen, rain, review, thru, ventilated, vents, visor, visors, window