
DIY: Installation of lowering springs on 07-08 GD3


#67
 07-31-2009, 01:32 PM
I got my Skunk2 springs in the mail today.
On my lunch break ( 1 hour ) I ran to the bank, post office box, taco bell then went home and had 40 mins left. I ate, had a cig, took a dump and had like 30 mins left. In that 30 mins (Of which 5 is needed to get back to work) I had the rear springs installed and the car ready to go. I was back to work with 1 min to spare.
Moral of story?
The rear spring install for this car couldn't be any easier.
I'll have the fronts done tonight when I get home.


#72
10-20-2009, 03:35 PM
^ Sounds like you may have missed a step or forgot to install a part. The strut tower should look like this if everything is reinstalled correctly.
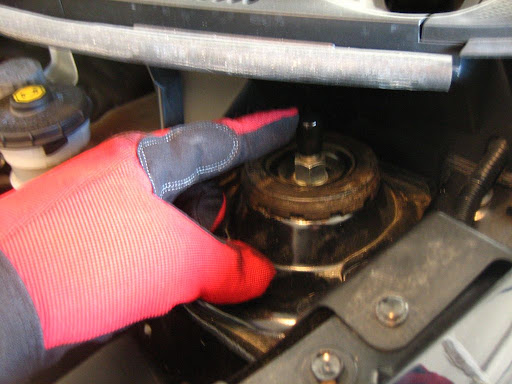
and the shock assembly should look like this (well, with your aftermarket spring installed instead of this stock spring).

and the shock assembly should look like this (well, with your aftermarket spring installed instead of this stock spring).
#74
10-20-2009, 06:27 PM
this is possible. i believe my fronts installed with the logo upside down. the upper spring clip seat (the light gray colored thing that you wind the spring into) should be on straight. it would look crooked if the spring is installed upside down.
#75
10-20-2009, 07:44 PM
my springs had the text facing right side up. if i remember correctly they only fit one way, the rears are a different story
#76
10-20-2009, 11:21 PM
Well they sit in the light Gary peice fine. What I found is that the spring going over bumps moves out of the grove... When car is jacked up I can move the spring by hand. So first I though ok so the nut compressing the spring is not tight enough. So I used an impact on it and gained about five threads but, it sill moves inside it's bottom seat. It just won't stay in the grove. So I'm going to turn them upside down and see if that works, if it doesn't I give up. I had no extra parts... Any ideas?
#77
01-02-2010, 07:30 AM

Hi all and have a great 2010!
I have a small question. I've just bought myself a couple of H&R springs and my local garage keeps on repeating the OEM shock (a Kayaba, I think) must be modified in order to avoid being destroyed. Now, I wonder if the front bumpstop trimming is simply all what's needed to have the springs correctly installed.
Thanks in advance and, again, best wishes of a great year!
Stefano
P.S.:Is there any way to add some more caster to original setting? I find the steer dull in getting realignment after a corner.
Last edited by jazzista; 01-02-2010 at 07:36 AM. Reason: P.S. added
#78
01-07-2010, 06:27 PM
Hi all and have a great 2010!
I have a small question. I've just bought myself a couple of H&R springs and my local garage keeps on repeating the OEM shock (a Kayaba, I think) must be modified in order to avoid being destroyed. Now, I wonder if the front bumpstop trimming is simply all what's needed to have the springs correctly installed.
Thanks in advance and, again, best wishes of a great year!
Stefano
P.S.:Is there any way to add some more caster to original setting? I find the steer dull in getting realignment after a corner.
I have a small question. I've just bought myself a couple of H&R springs and my local garage keeps on repeating the OEM shock (a Kayaba, I think) must be modified in order to avoid being destroyed. Now, I wonder if the front bumpstop trimming is simply all what's needed to have the springs correctly installed.
Thanks in advance and, again, best wishes of a great year!
Stefano
P.S.:Is there any way to add some more caster to original setting? I find the steer dull in getting realignment after a corner.
Also - you're probably looking for more negative camber, not caster. you'll probably want to get a camber bolt kit for the front after lowering the car anyway. SPC makes an affordable one.
#79
01-08-2010, 04:46 AM
Thank you, Tofuman,
so the trimming would indeed suffice even if car is usually used moderately loaded?
About the caster/camber, I've read the caster is what helps wheel self centering and that's what I find lacking in SWMBO's Honda Jazz/Fit. Would you mind explaining me how negative camber might helps steering wheels getting self centered after a corner?
Meanwhile, I'll give a look at the SPC kit...
Thanks a lot,
Stefano
Last edited by jazzista; 01-08-2010 at 10:55 AM. Reason: typos