
2017 EX 6MT - Crystal Black Pearl
#161
 04-28-2015, 12:14 PM


Adding Heated Seats and LED Side Mirror Winkers
Bit the bullet and bought the parts required to get these mods done.
Here is the list from Bernardi parts, and used the shipping coupon for us Fit Freak members!! At this point I'm well beyond the $2000 point in mods, but ya know what...one pays for what they want!!
Here are the Amazon.com parts, the heated seat kit for two seats and the add a fuse kits. The owners manual calls for a 20A fuse on fuse# 19 for the under dash AUX panel. Should be very easy to tap into it. Likely the same issue with the heated side mirrors: there is an open fuse slot, but there is no load wiring going to the accessory since it was not an available trim option. No problem. I got this!!!!
SKUItemShippingPriceQuantityLine Total34350-T2A-A02 Honda LIGHT ASSY., L. SIDE TURN Selected Part# 34350-T2A-A02
Unshipped $44.88
1 $44.88 34300-T2A-A02 Honda LIGHT ASSY., R. SIDE TURN Selected Part# 34300-T2A-A02
Unshipped $44.88
1 $44.88 76251-T5R-P01ZF Honda CAP, L. SKULL *NH731P* (SIDE TURN) Selected Part# 76251-T5R-P01ZF
Unshipped $73.13
1 $73.13 76201-T5R-P01ZF Honda CAP, R. SKULL *NH731P* Selected Part# 76201-T5R-P01ZF
Unshipped $73.13
1 $73.13 83407-T5R-A41ZA Honda LID, SWITCH *NH900L* Selected Part# 83407-T5R-A41ZA
Unshipped $5.03
1 $5.03 35600-TF0-003 Honda SWITCH ASSY., R. HEATED SEAT Selected Part# 35600-TF0-003
Unshipped $16.43
1 $16.43 35650-TF0-003 Honda SWITCH ASSY., L. HEATED SEAT Selected Part# 35650-TF0-003
Unshipped $18.05
1 $18.05 32114-T5A-J00 Honda SUB-WIRE, CENTER CONSOLE Selected Part# 32114-T5A-J00
Unshipped $25.53
1 $25.53
I may do the DRL foglight garnish from China once these are done. I may just figure some way to use the switchback LED strips from Oznium instead since I already have them. TBA on this one!
Cheers!
Bass
#163
05-18-2015, 11:21 AM
Hello to all!!
I have successfully adapted the aftermarket wire harness of the heated seat kit to the OEM switches. Still in the process of finishing up the nitty gritty details, I'll provide that once it is complete.
1. The aftermarket switch has 4 pins, OEM has 6. The two extra pins are for the dashboard illumination. I will tap into the LED under dash lighting to make the two switch's light when the headlights are on.
2. The aftermarket has a bi-color LED, while the OEM has an LED for each function. The heated seat kit is not wired for two independent LEDS, only a bi-color LED, which is two LEDS wired together in antiparallel. With the OEM switch set to low, both high/low LEDS light up.
3. To correct (2) you need to add a SPST relay to the high setting power feed to correct this. Its not mission critical to add this relay, the switch will work just fine, but me, I like to have the LED and switch work as OEM.
4. Finally I am installing the heated pads on seat covers I got off ebay. The cloth seats are in fact glued at the seams. One could remove the fabric from the foam to install the pads, but its too much work and I risk making the fabric fit improperly, creased, folded, and/or compromise the integrity of the seat fabric itself. The good thing about the seat cover kit below is it has the proper sizing for the rear 60/40 Magic seat to work un-impeded.
http://www.ebay.com/itm/3D-Air-Mesh-Fabric-Seat-covers-Full-Set-for-Honda-Gray-Black-More-Color-/221654997334?var=&hash=item7930e43aa6&vti=Color%09Black
***Here is the stock photo, Ill take pictures once I'm done installing in the vehicle.

On the LED winker project, I still need to pickup/order some hardware (self tapping screws) to mount the LED light assembly. Bernardi Parts accidently sent me two LEFT LED assemblies, though the box had the part# for the RIGHT. They called me the other day and they reordered it, happened to check the box before they sent it to me and behold, Honda packed the box wrong again with the LEFT led in a box marked for the RIGHT. DOH! Chris @ BP has been very helpful with me correcting this problem. I'll advise on the final resolution.
Cheers!
I have successfully adapted the aftermarket wire harness of the heated seat kit to the OEM switches. Still in the process of finishing up the nitty gritty details, I'll provide that once it is complete.
1. The aftermarket switch has 4 pins, OEM has 6. The two extra pins are for the dashboard illumination. I will tap into the LED under dash lighting to make the two switch's light when the headlights are on.
2. The aftermarket has a bi-color LED, while the OEM has an LED for each function. The heated seat kit is not wired for two independent LEDS, only a bi-color LED, which is two LEDS wired together in antiparallel. With the OEM switch set to low, both high/low LEDS light up.
3. To correct (2) you need to add a SPST relay to the high setting power feed to correct this. Its not mission critical to add this relay, the switch will work just fine, but me, I like to have the LED and switch work as OEM.
4. Finally I am installing the heated pads on seat covers I got off ebay. The cloth seats are in fact glued at the seams. One could remove the fabric from the foam to install the pads, but its too much work and I risk making the fabric fit improperly, creased, folded, and/or compromise the integrity of the seat fabric itself. The good thing about the seat cover kit below is it has the proper sizing for the rear 60/40 Magic seat to work un-impeded.
http://www.ebay.com/itm/3D-Air-Mesh-Fabric-Seat-covers-Full-Set-for-Honda-Gray-Black-More-Color-/221654997334?var=&hash=item7930e43aa6&vti=Color%09Black
***Here is the stock photo, Ill take pictures once I'm done installing in the vehicle.
On the LED winker project, I still need to pickup/order some hardware (self tapping screws) to mount the LED light assembly. Bernardi Parts accidently sent me two LEFT LED assemblies, though the box had the part# for the RIGHT. They called me the other day and they reordered it, happened to check the box before they sent it to me and behold, Honda packed the box wrong again with the LEFT led in a box marked for the RIGHT. DOH! Chris @ BP has been very helpful with me correcting this problem. I'll advise on the final resolution.
Cheers!
#164
06-05-2015, 11:43 PM
Part 02 of the heated seat project.
Heated Seat Install Part 02
Winker project on hold still. Still waiting for parts from Bernardi. Seems they mis-shipped my latest order for hardware, didn't give me the right count of screws I ordered. They are specific to mounting the LED assembly on the mirror frame. Cant do the job without them.
Heated Seat Install Part 02
Winker project on hold still. Still waiting for parts from Bernardi. Seems they mis-shipped my latest order for hardware, didn't give me the right count of screws I ordered. They are specific to mounting the LED assembly on the mirror frame. Cant do the job without them.
Last edited by Bassguitarist1985; 06-05-2015 at 11:45 PM.
#165
06-20-2015, 09:12 PM
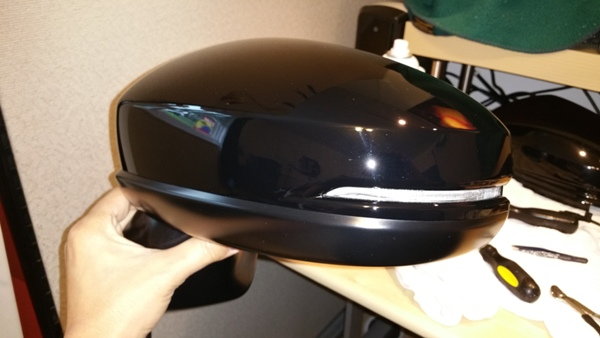
Pictures of my full LED light conversion. Pictures don't do it justice though. At about $25 USD/bulb, the reverse, rear turn, and front switch backs are amazing!
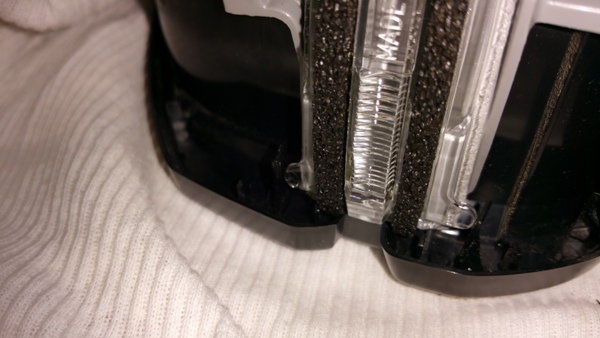
1. Used two screws to mount the LED mirror assembly
2. Had to break off a small corner of the LED assembly to fit on the EX mirror frame.
3. Bottom part of skull snaps together with the top part. Perfect fit between the EX and EX-L
4. Connected the LED ground to existing ground of heated mirrors
5. One hot wire (yellow) to run LED mirror assembly. Snaked wire to engine compartment and connected to blinker wires. Tapped at the load resistor wire since it was easier.
Cheers! Heated seats are next!!!!
Part 02: https://youtu.be/cft8pB1t5jU
Last edited by Bassguitarist1985; 06-20-2015 at 10:02 PM.
#167
07-21-2015, 09:35 AM

Hello! Nice ride you got. I'm interested in getting window visors. What company made yours? I'm interested in the JDM Mugen ones on Amazon here:
Also the mud flaps would be nice. Did you have to do any drilling to install them and are those Honda oem?
#168
07-21-2015, 10:04 AM
Hello! Nice ride you got. I'm interested in getting window visors. What company made yours? I'm interested in the JDM Mugen ones on Amazon here: Amazon.com: JDM MUGEN 3D STYLE SMOKED CLIP-ON TYPE WINDOW VISOR FOR 2015 2016 3RD GEN HONDA FIT: Automotive
Also the mud flaps would be nice. Did you have to do any drilling to install them and are those Honda oem?
Also the mud flaps would be nice. Did you have to do any drilling to install them and are those Honda oem?
Thank you! I have the OEM Visors and Mud flaps. No drilling needed for the visors. The mud flaps for the front ones anyway just to need to do some self tapping screws and you are all set to go.
#169
07-21-2015, 11:29 AM

Well, so much for posting the directions, but it's not difficult, although there are a lot of steps involved.
#171
07-27-2015, 10:41 PM
DRL Foglight Garnish with Switchback
Got these from China in the mail today. They are a perfect fit for the USDM GK Fit!!
It not only will serve as my DRL, but it is a 2nd pair of switchback LEDs for the turn signals! These are Type A switchbacks, NOT Type B.
Now I will say that the controller unit it came with is junk. Mine was flickering in DRL mode. They used very cheap components to get the DRL/Switchback function in the same module. I was able to repair the unit for now, but seller I contacted hopefully will send me a new one. If not I have no problem custom fabricating my own switchback and DRL module. They are pretty damn simple circuits actually, for me anyway!
Notably the two LED arrays are wired in a "common cathode" topology. That means the negative terminals are connected together, and the controller alternatively powers each array at the anode side. This is called current sourcing. If one were to get the Oznium switchback driver and LED strips (which I have) and many other LED strips on the market today, they have a "common anode" topology. This is referred to as "current sinking."
I'm told current sinking is better than current sourcing, but the jury is out on truly which is better. Its all based on the quality of the components. China quality is marginal at best.
I'll post more pictures and video once I've installed them onto the car!
LED Daytime Running Light For Honda FIT JAZZ DRL Fog 2014 2015 Turn Signal
http://www.ebay.com/itm/181744070790?_trksid=p2060353.m2749.l2649&ssPageName=STRK%3AMEBIDX%3AIT
Last edited by Bassguitarist1985; 08-31-2015 at 10:36 PM.

#173
08-26-2015, 11:05 PM
Yessir and they look great! Warm too! The back seats i didnt put on. They didnt exactly fit with the magic seats.
Last edited by Bassguitarist1985; 08-26-2015 at 11:25 PM.

#175
09-17-2015, 03:48 PM
By plug, you mean the male portion? Does there seem to be any place to connect it? Where abouts is it? What color wire? I just looked at mine and didn't see anything.
#176
09-18-2015, 10:20 AM
Do you have a picture? I'll check when I have a moment to look under the seat. It may be only specific to the Canadian Fits.
#178
09-20-2015, 09:05 PM

Drunk person backed into my drivers door. Dropped the car off at the body shop. Guy is being cool and paying for it.
Car will be down for 3 days. Have to replace the entire driver side front "skin" of the door. Shop quoted $1700 in total. Shop is owned by a friend of mine, and the guys insurance is paying for it so all is good. Hes doing the skin, and repainting the entire side of the car so all the panels match. He has to remove my body molding and repaint those too. The ivtec sticker he needs to remove, already got a replacement to put on once hes done.
Even went a step further and disassembled the door much as I can including removing the mirror (since ive done this multiple times) to cut down on the labor time.
This is a great opportunity to upgrade the speakers. I started a new thread about my sound system upgrades.

Door inner skin and water shield removed. The red/black/yellow wires are for my heated side mirrors and LED winkers.
Ill post updates soon
Bass
Last edited by Bassguitarist1985; 09-21-2015 at 09:12 AM.
#179
09-24-2015, 11:37 PM
Replacement Honda Door Skin: BEWARE! THIN METAL!
Got the car back from the body shop today. My buddy did an amazing job on the paint! Car looks brand new again! Now the not so good news is I discovered that my driver side mirror was shaking. At first I thought it was the glass itself, but it turns out its the entire assembly.
Okay, one would think, tighten the 3 bolts and I'm good right? Welp, the bolts were tight as can be, and still shaking. A quick comparison of the driver and passenger side reveals that the OEM passenger door skin is WAY THICKER than the Honda OEM replacement shell for the driver side. The skin itself is flexing in the wind causing the mirror to shake! I looked and all the reinforcement bars are fine and there is panel bond glue where it should be.
My buddy from the shop is going to take a look at it, but I pretty much know what my options are. The less likely situation is to see if Honda would provide another door skin that is thicker, but thats a crap shoot. If the skin is as thin as the other replacement, well that don't help.
The more likely option is I will need to fashion a piece of sheet metal of adequate thickness and place it inside behind where the side mirror mounts to reinforce the metal. Thicker metal with some over sized washers to spread the mounting pressure out over the sandwiched metal piece will reinforce the area and minimize if not eliminate the flexing of the skin. I believe this route is the way I'm gonna go.
This was certainly not the fault of the shop, more like an el cheapo (quite literally) OEM door skin from Mexico.
Lesson of the day, screw replacing the door skin, just get an entire new door and hope its skin is thicker than the replacement skin!
One other thing to mention. My Sirius LED conversion kit is acting up again. A few months ago, Sirius had to send me a replacement bulb as the LED array was flickering. the control module was fine. Now it seems that the other LED bulb that I didn't replace has the same problem. Hopefully I will hear back from Jeff @ Sirius to have a replacement sent. It would seem that heat is a factor. I actually took the defective one apart, and wouldn't ya know...there was no heat sink compound on the LED array!! No wonder it failed! I'll give this kit one more try. I'll get the replacement and see what happens...maybe I got two bumb bulbs...but if another one starts to flicker, I'm going back to halogens until I can find a better LED conversion. I'm not wanting to do HID's because of the need to install a projector.
#180
09-25-2015, 07:01 AM
That's surprising. Usually, the OEM replacement parts are just as good as OEM. You could try to cover the inside of the skin with some Dynamat - maybe a double layer.