
2017 EX 6MT - Crystal Black Pearl
#181
 09-25-2015, 10:04 AM


Some dynamat and a piece of sheet metal I believe will solve this issue. I cannot blame my shop or the dealer who ordered the part for me, I mean how could they have known. I looked inside the door myself and everything was assembled properly. If sandwiching sheet metal behind the skin doesn't stiffen it up, the shop may have to actually weld the metal behind the skin to stiffen it up. I hope it does not come to that, but that's the only other way I can see solving this issue.
#182
09-27-2015, 01:52 AM
Its late after coming back from a great band gig, but the update is positive. Using some 2inch wide 1/8" thick steel bar, JB weld, and industrial 3M tape, little to no more shake in the door skin! Spent a majority of the day cutting and bending pieces to fit the contour of the inner door skin. Granted this was annoying as fuck to do, but glad i didnt have to tie my car up at the body shop during the week.
Now i can get back to reinstalling the dohc ivtec sticker and upgrading my sweet ass new kenwood speaker system! In between football games tomorrow though!!
I fully plan on parking out of the way of others and not driving in any inclement weather regardless of traversability. This GK has been bashed, smashed scratched more than my two previous Fits combined! Other than me fucking up my rear bumper all the other car injuries were caused by others. It's also the most customized Fit out of the 3 I've owned. Funny how that works out huh?
#183
09-29-2015, 02:28 PM
Welp, sad to report that my sheet metal job did not work. The pieces will not stay stuck to the inner skin of the door. Bringing the car back to the body shop for them to fix. Guy said hes not to charge me extra for it. My Honda contact is just as puzzled as myself/body shop. Normally if you buy an aftermarket door skin those companies tend to cheap out on the metal and its thinner than OEM. When you buy OEM....you buy the part that's as good as what was on the car. never had any issue till the skin was changed.
The good news is if the body shop is unable to fix the door skin, my Honda contact said that it would be a part warranty issue at that point. So any further body shop costs would hopefully be covered by Honda. That's the theory and hope. So incredibly frustrating when OEM parts are sub par quality.
The good news is if the body shop is unable to fix the door skin, my Honda contact said that it would be a part warranty issue at that point. So any further body shop costs would hopefully be covered by Honda. That's the theory and hope. So incredibly frustrating when OEM parts are sub par quality.
#184
09-29-2015, 04:34 PM
Be wary of re-skinning the outer door. If not sealed correctly it will rust like a mofo. happened to my csx. Honestly that could have been popped out and buffed/repainted without needing a whole repair. then you could have maintained original integrity.
#185
09-29-2015, 09:28 PM
Thank you for the warning I did read about improperly sealing a door after it has been reskinned. I'm honestly hoping that Honda will kick in at this point and just get me a whole new door, or at the very least another door skin and kick in the additional labor as a result of an inferior part. I'm pretty OCD about my car and I can confidently report that the body shop did do a good job with the sealing, welding, and panel bond. I really believe that Honda provided an insufficient part.
#186
10-01-2015, 12:46 AM

Finally a day where it was warm enough to work on the Fit!

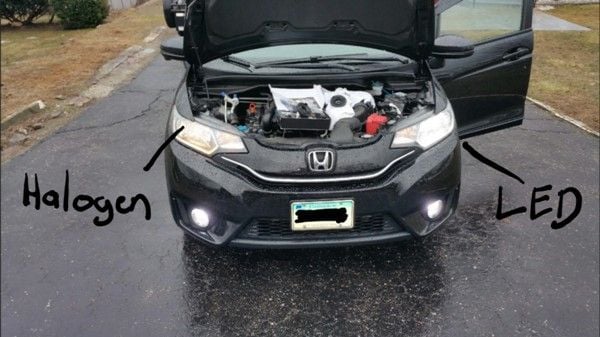
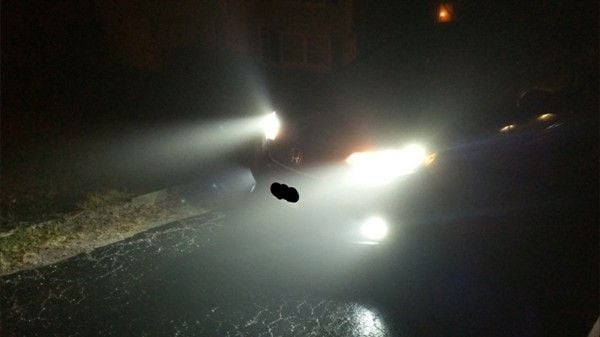
LOW BEAM WITH FOG: 20 feet away.

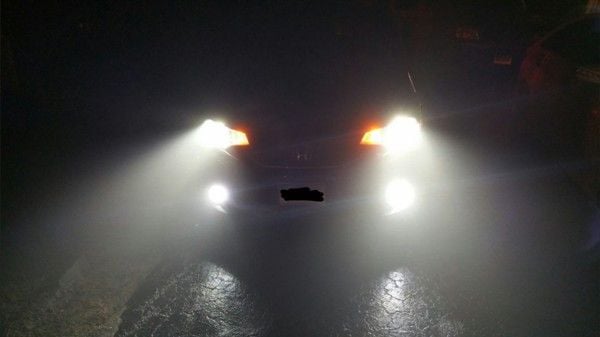
HIGH BEAM: 20 FT away.

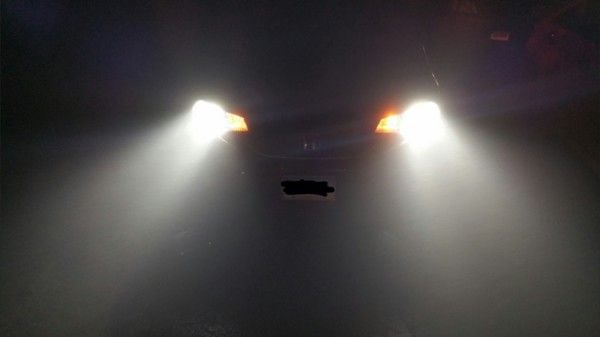
LOW BEAM WITH FOG: ~80-100ft away on a nearby dead end street with no streetlights. Taken over the dash without a flash.

HIGH BEAM 02

As you can tell, tonight was extremely foggy in CT, but you get to see how the lights are projecting. There is most certainly a difference in brightness. I'll reserve my judgement once I drive on a clear night and see how well they "throw" in front of me. Noone on the highway was flashing their lights at me either.
LOW BEAM WITH FOG
HIGH BEAM
LOW BEAM WITH FOG: 20 feet away.
HIGH BEAM: 20 FT away.
LOW BEAM WITH FOG: ~80-100ft away on a nearby dead end street with no streetlights. Taken over the dash without a flash.
HIGH BEAM 02
As you can tell, tonight was extremely foggy in CT, but you get to see how the lights are projecting. There is most certainly a difference in brightness. I'll reserve my judgement once I drive on a clear night and see how well they "throw" in front of me. Noone on the highway was flashing their lights at me either.
LOW BEAM WITH FOG
HIGH BEAM
Ever thought of doing a projector retrofit?
Your car looks good all its missing is a retrofit.
Look into it on hidplanet or from the retrofit source or headlight junkies group on fb. I think you will like it.
#187
10-01-2015, 10:33 AM
The Sirius LED kit I installed for the record, I have had two bulbs fail on me within a year. The array inside the LED chip started to flicker due to heat stress. Taking them apart revealed no heat sink compound on the chip itself which is likely the cause of failure. The company is VERY GOOD to work with, they have replaced both under warranty. Hopefully I will not have any further issues. They are aware of my forum thread on here.
#188
10-01-2015, 04:58 PM
Door Skin Mystery SOLVED!
I have a really good body shop, and being a personal friend of mine he really did me a solid. He thankfully still had the original door skin to compare to. It turns out that there IS a reinforcement panel piece on the original skin near the side mirror mount! The replacement skin did NOT have this reinforcement piece installed.
He took pictures for me and I'll post once I have them. He is going to first try to use some sort of hard panel bonding material to stiffen up the skin the right way, but in the event it does not get the desired effect, Honda said they will parts warranty the skin and the body shop will dothe work all over again installing and paint the skin.
What a cluster fuck of a situation! Just glad it will be fixed right!
#189
10-26-2015, 06:01 PM
A. Yes I will install it myself, or at least try anyway. You are correct to get to it I need to remove the undercarriage covers. Once I do that it should be easy to replace the drain plug with this.
it is not thermostatically controlled, its always on. You can easily add a 30-35F thermostatic outlet. Basically turns on below 30 degrees, and shuts off above 35 degrees F.
B. The battery warmer is 80 watts, not controlled.
http://www.bernardiparts.com/images/...r_AII51184.pdf


I know some of you will say it is not necessary to have one of these here in New England. I will defend and say that while most days in winter I should not need it, the few weeks where it is below 0 F it will be a very good addition. Coupled with the battery warmer blanket, and an automatic 1.5 amp battery maintainer I will theoretically not have any cranking issues, or need to warm up the car as long. I'm not kidding on the bitter cold either. This screenshot was taken in February of 2015.

I plan to use an automatic timer for the heaters, and the battery maintainer will always be on since it is automated.
Keep everyone posted!
Bass
Last edited by Bassguitarist1985; 10-26-2015 at 06:11 PM.
#190
10-27-2015, 08:07 AM

Instructions only say to do that when routing the wire harness. I'd rather route the harness up into the engine bay where it forces me to open the hood to disconnect/connect it. That way I never forget I have the damn thing and inadvertently drive off with the extension cord still attached.

#192
11-07-2015, 05:42 PM

Congrats on your mods! Especially the heated mirrors. Any tips on removing the mirror glass? I tried tackling my passenger side mirror with a flat-head and just can't seem to figure it out... any help is appreciated!
#193
11-07-2015, 11:16 PM
Flat head is your best bet. There are 4 clips holding it in. Release each one before trying to pry it away. Refer to my videos too
#194
11-09-2015, 06:34 PM

love the DRL fog light with the switch back.
i only wish they weren't so blue.
i been looking for DRL that will work with US bumper for a long time.
alot of them on ebay only work for jdm fit or jazz model
i only wish they weren't so blue.
i been looking for DRL that will work with US bumper for a long time.
alot of them on ebay only work for jdm fit or jazz model
#195
11-09-2015, 07:45 PM
Yeah the color temp is a tad higher than 6k making it look a bit more blueish. If my LED fogs and headlights matched it would look better. Still love the look just the same. Color temp is a small issue to me.
#196
11-10-2015, 08:23 AM

Will be tackling this project starting this weekend. Now that my stereo install is complete and body work done.
I know some of you will say it is not necessary to have one of these here in New England. I will defend and say that while most days in winter I should not need it, the few weeks where it is below 0 F it will be a very good addition.
Keep everyone posted!
Bass
I know some of you will say it is not necessary to have one of these here in New England. I will defend and say that while most days in winter I should not need it, the few weeks where it is below 0 F it will be a very good addition.
Keep everyone posted!
Bass
For charging, I use a smart charger with a connection I leave on the battery.


#197
11-10-2015, 09:42 AM
This looks like a good project. Starting out with a warm engine and warm oil is good for the engine, the MPG, and you. My only hesitation is the cost of electricity. I use synthetic oil, so that should ease those cold starts.
For charging, I use a smart charger with a connection I leave on the battery.
For charging, I use a smart charger with a connection I leave on the battery.

AutoCraft 1.5 Amp Mounted Battery Charger/Maintainer AC-M15CR/SE-1-1: Advance Auto Parts
The battery blanket is a 15 minute job, and the block heater I want to get some extra antifreeze as I know I will lose some when I swap the plug out for the heater plug. I'm hoping not too much. I am not planning on draining the cooling system like the instructions say. Its not necessary.
Electrically speaking I'm looking around 600-700 watts between the battery blanket, bat maintainer, and block heater. A timer switch to limit its run time to 2-3 hours prior to leaving work is ideal, as others mentioned anything beyond that time limit is wasting electricity.
Last edited by Bassguitarist1985; 11-10-2015 at 09:46 AM.
#198
11-10-2015, 10:11 AM
The battery blanket is a 15 minute job, and the block heater I want to get some extra antifreeze as I know I will lose some when I swap the plug out for the heater plug. I'm hoping not too much. I am not planning on draining the cooling system like the instructions say. Its not necessary.
EDIT: I just looked at the directions on the College Hills site, and I will not be doing that job. It requires removal of the front bumper. When mine was removed for the bumper recall, the guy who did the work broke the screw tab at the top of the right side. When I put the bumper back on after installing louder horns, I wasn't able to get the little snap tab back into place on the top left. It bent and broke. With my '97 Civic, I could have the bumper off in ten minutes. This is not a great design for removing or replacing.
Last edited by SilverEX15; 11-10-2015 at 10:22 AM.
#199
11-10-2015, 10:29 AM
I wont be removing the bumper either. i did it once for the DRL job, and thats it. Not that I cannot do it again, but I prefer not to. Instructions tell you to remove the bumper so you can snake the wire through the front grill. I'd rather snake it through the engine compartment and have the extension cord go through the engine bay under the hood rather than through the front grill. Its less work and when done right is no risk to functionality or safety.
I'm brewing beer this Saturday, so I wont have the time to check into this that day. Sunday I might though. Even if at minimum I jack the car up, remove the under panel and poke around down there to size up the job while taking pics/video for the forum community.
The hardest part is installing the heater plug and checking for leaks. The wiring and routing of wires I can do in my sleep.
#200
11-10-2015, 11:09 AM
I plan on posting pics, you know me!
I wont be removing the bumper either. i did it once for the DRL job, and thats it. Not that I cannot do it again, but I prefer not to. Instructions tell you to remove the bumper so you can snake the wire through the front grill. I'd rather snake it through the engine compartment and have the extension cord go through the engine bay under the hood rather than through the front grill. Its less work and when done right is no risk to functionality or safety.
I'm brewing beer this Saturday, so I wont have the time to check into this that day. Sunday I might though. Even if at minimum I jack the car up, remove the under panel and poke around down there to size up the job while taking pics/video for the forum community.
The hardest part is installing the heater plug and checking for leaks. The wiring and routing of wires I can do in my sleep.