
MODS/ACCESSORIES for the GK
#481
 09-30-2014, 01:25 AM


Yeah, I read the post. Got the uppers in July and could have already gotten the pair if not for the cost. That alone was $350 and the lowers are almost double so I decided to stick with the original lower cluster since the US GK brake lights are LEDS.
15BlkPrl will be getting his at dealer cost.
Mine was at retail pricing from a Japanese Honda dealer in Tokyo. Those guys do not "discount".
The continuity of the matching pair would be nice though. Just over spent on all the other stuff.
15BlkPrl will be getting his at dealer cost.
Mine was at retail pricing from a Japanese Honda dealer in Tokyo.
Those guys do not "discount".The continuity of the matching pair would be nice though. Just over spent on all the other stuff.
What the WHAT???? I didn't realize you were finally back. WB Rott!
Nice ride BTW! Can't wait to see all that you do to it.
#482
09-30-2014, 01:27 AM
Join Date: Mar 2014
Location: Hawaii: relocated to Western Canada Sept, 2015
Posts: 1,116
The source originated from JapanTragic when we traded PM's last April. Wife's relatives got them for me as with my upper tail-lights.
Here's the link to the retailer. Hope you can read Japanese.
�ڳ�ŷ�Ծ�ۡڥ���زġۥϥ��ץ� �ޥ����륫���ܥ� ����֥����ꥢ�ѡ� �ۥ�����ե��åȥϥ��֥�åɡ�GP5����H25/09���ˡ�UJ-FACTORY
They are sold individually. I ordered three different sets. One each for Front grill, steering wheel and Rear Hatch. Total cost was around $50 (no shipping).
Good luck and happy shopping!!!
BTW, its worth mentioning that the back sticky tape is pretty strong (guess cause its made in Japan) so make sure of your placement before letting it touch any surface. Ya gotta be carefull!!!
Last edited by ROTTBOY; 09-30-2014 at 01:58 AM.
#483
09-30-2014, 01:44 AM
Join Date: Mar 2014
Location: Hawaii: relocated to Western Canada Sept, 2015
Posts: 1,116
Appreciate the welcome and read some of your posts earlier today. Looks like your achieving your objectives with your current set-up. Man, doesn't it feel good!!!!
Am also liking what the SPOON boys are doing. Alas, I shall leave it to the younger GK FF owners to lead the way.
As for my GK, have done a bit (scroll to previous recent posts and it'll have the pics). I would say 30% is done. Will keep you and everyone else updated.
Similarly I look forward to seeing what everyone else is doing. So much to learn, unfortunately, at my age, so little time to apply everything. At least the FF forum allows me to read and enjoy the success of others.
#484
09-30-2014, 02:15 AM

Yeah, I read the post. Got the uppers in July and could have already gotten the pair if not for the cost. That alone was $350 and the lowers are almost double so I decided to stick with the original lower cluster since the US GK brake lights are LEDS.
15BlkPrl will be getting his at dealer cost.
Mine was at retail pricing from a Japanese Honda dealer in Tokyo. Those guys do not "discount".
The continuity of the matching pair would be nice though. Just over spent on all the other stuff.
15BlkPrl will be getting his at dealer cost.
Mine was at retail pricing from a Japanese Honda dealer in Tokyo.
Those guys do not "discount".The continuity of the matching pair would be nice though. Just over spent on all the other stuff.
Hey it will still be fabulous to have that tailgate lit up!!! I am JEALOUS! I can't afford any of it right now...
Thanks for sharing all your progress with us!
.
#485
09-30-2014, 12:00 PM

You know Rottboy, I lurked on this thread months before the GK landed here ever since the GK was announced in Japan and I saw Japan traffic's Fit. I read this thread you started way back when it first originated and then after awhile decided to create an account here in FF. In the end, the idea of having a Honda, a hatchback, and modding a hatchback with magic seats  led me to WANT the GK and purchase it off the spot when I located a PBP at the dealership before it even went through PDI. It was literally still sitting on the truck. Almost three months in and Im sure I've already spent more than a grand on mods, and I'm sure some of us here spent even more. This is an expensive thread but it sure is fun and brings back lots of those teenager years. Gf sure isn't pleased "men and their toys" she always says to me. Love this thread.
led me to WANT the GK and purchase it off the spot when I located a PBP at the dealership before it even went through PDI. It was literally still sitting on the truck. Almost three months in and Im sure I've already spent more than a grand on mods, and I'm sure some of us here spent even more. This is an expensive thread but it sure is fun and brings back lots of those teenager years. Gf sure isn't pleased "men and their toys" she always says to me. Love this thread.
#486
09-30-2014, 06:14 PM

You know Rottboy, I lurked on this thread months before the GK landed here ever since the GK was announced in Japan and I saw Japan traffic's Fit. I read this thread you started way back when it first originated and then after awhile decided to create an account here in FF. In the end, the idea of having a Honda, a hatchback, and modding a hatchback with magic seats led me to WANT the GK and purchase it off the spot when I located a PBP at the dealership before it even went through PDI. It was literally still sitting on the truck. Almost three months in and Im sure I've already spent more than a grand on mods, and I'm sure some of us here spent even more. This is an expensive thread but it sure is fun and brings back lots of those teenager years. Gf sure isn't pleased "men and their toys" she always says to me. Love this thread.
led me to WANT the GK and purchase it off the spot when I located a PBP at the dealership before it even went through PDI. It was literally still sitting on the truck. Almost three months in and Im sure I've already spent more than a grand on mods, and I'm sure some of us here spent even more. This is an expensive thread but it sure is fun and brings back lots of those teenager years. Gf sure isn't pleased "men and their toys" she always says to me. Love this thread.BTW can anyone say group buy on those H emblem stickers??
Last edited by 15BlkPrl; 09-30-2014 at 06:19 PM.
#487
09-30-2014, 07:58 PM

had these laying around forever finally found a use for them. Weapon R checker floor mats.
I actually ended up using the front (longer one) for the rear and putting the shorts ones in the front.


LED interior lights
 \
\
my dogs seems to enjoyed the car very much. This is one of them (Shiba inu).

I actually ended up using the front (longer one) for the rear and putting the shorts ones in the front.
LED interior lights
\my dogs seems to enjoyed the car very much. This is one of them (Shiba inu).
#488
09-30-2014, 10:03 PM
Join Date: Mar 2014
Location: Hawaii: relocated to Western Canada Sept, 2015
Posts: 1,116
Rear upper led lights installed
To all my FF friends and fellow FFs. have been busy the whole day doing this one install. The bad news, NONE!!! Didn't break a single thing. The good news, its installed and lighted.
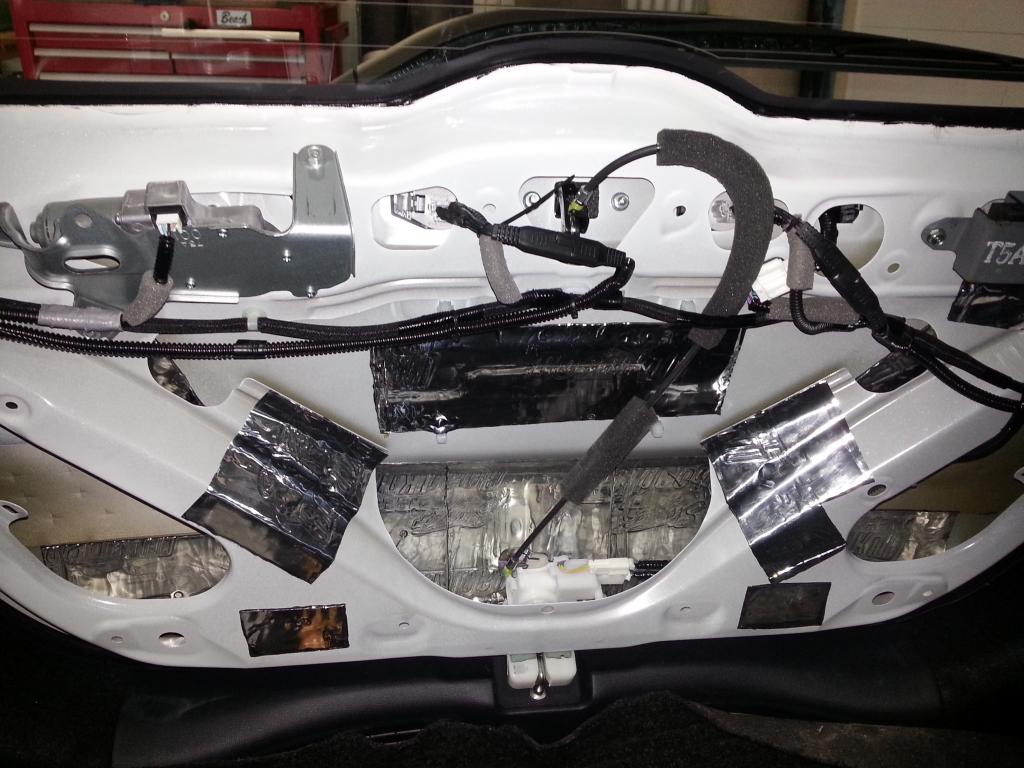
After removing the rear hatch trim, the connectors for the rear license plate are readily accessible. (gray colored). The far one (disconnected) is where I tapped the power. (Thanks to NORIPWR's helpful suggestion).
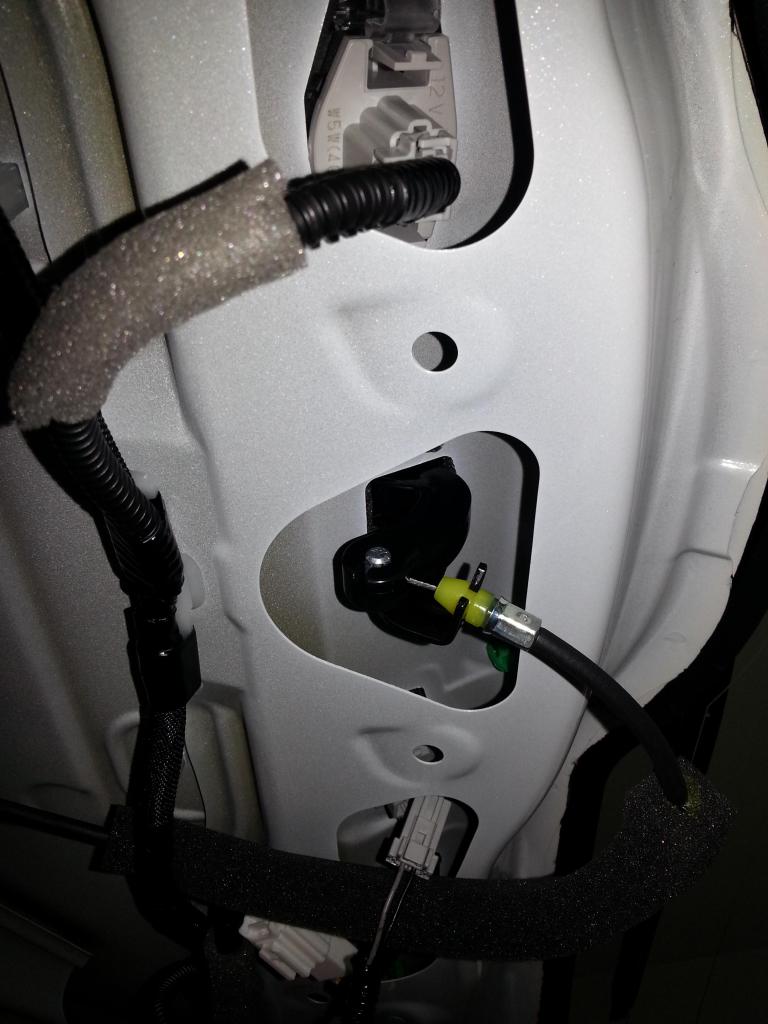
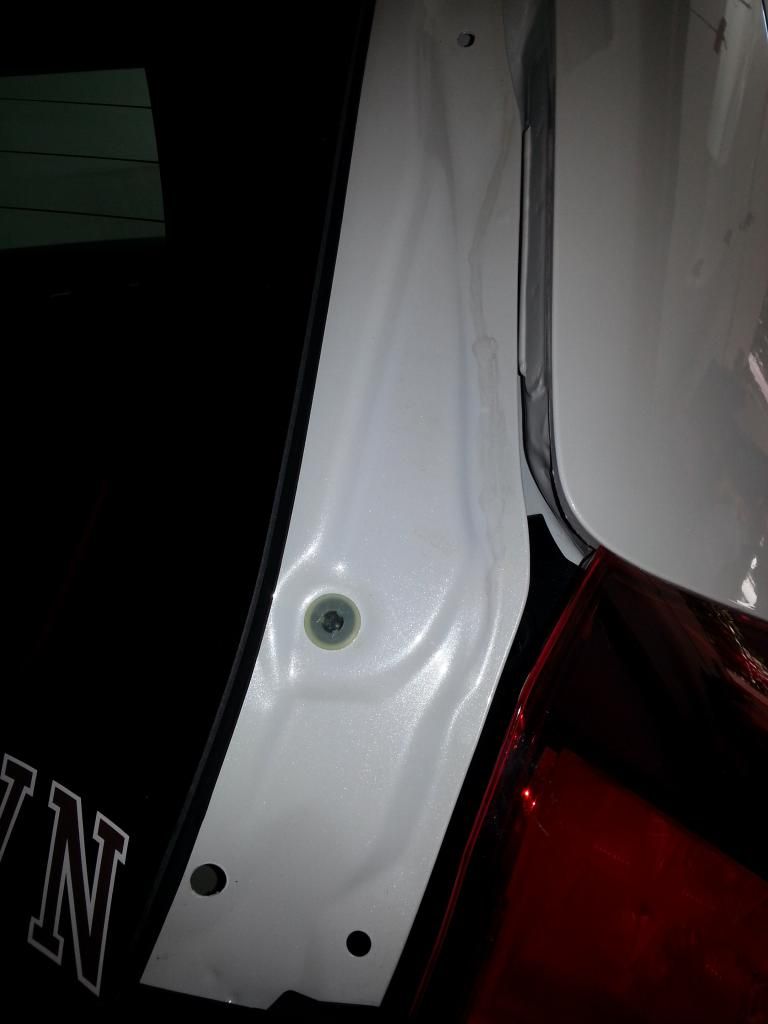
Next, drilled one hole on each side. Deburred them and applied WOP touch-up paint. Note the hole locations - its fits the grommet and length of the factory harness perfectly. Size of hole is 7/16".

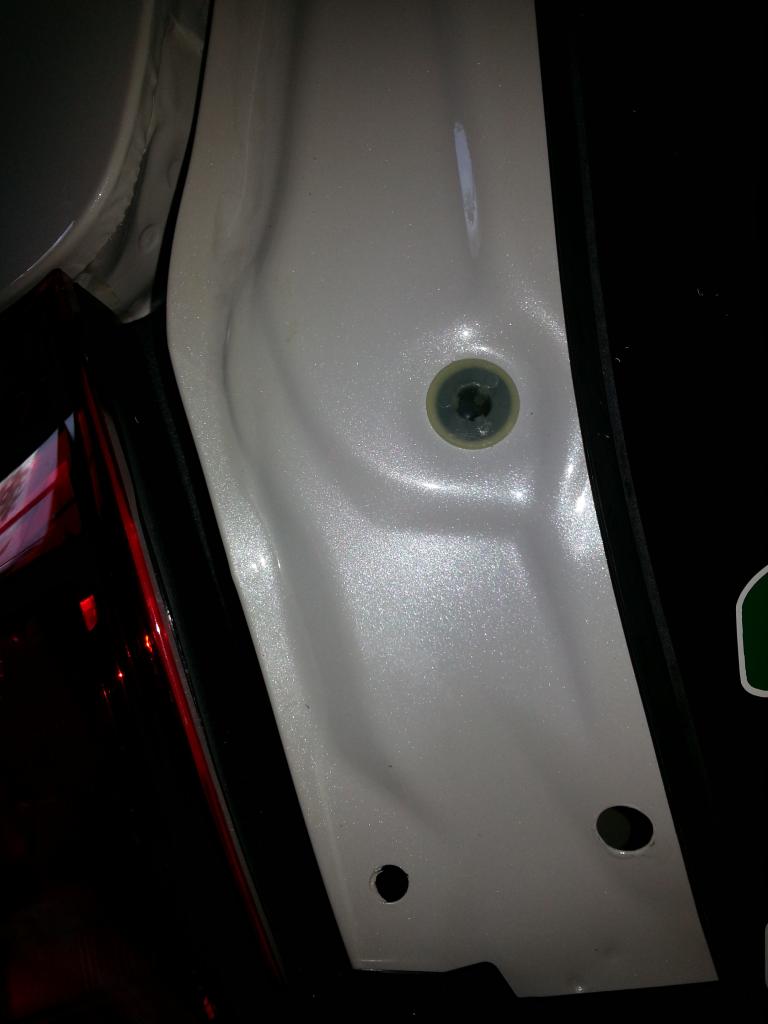
Applied silicone grease on the grommet so it gets in the hole easily. Here's a pic before the final install of the LED fixture to the body. (BTW, the LED nut size is 5/16")
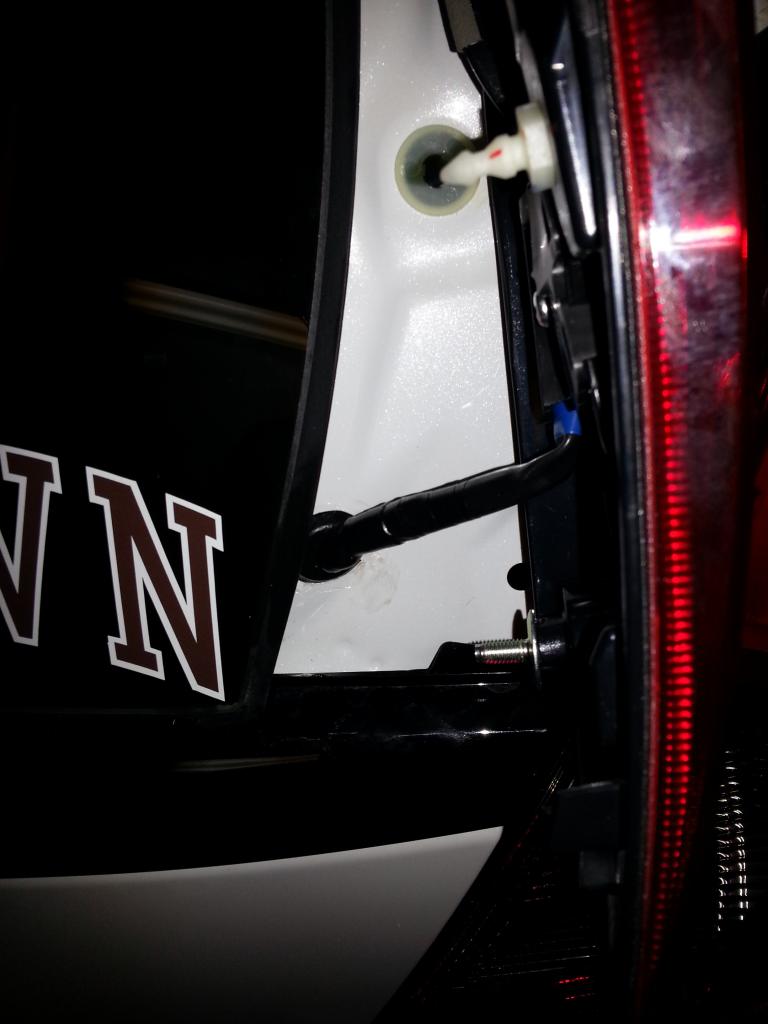
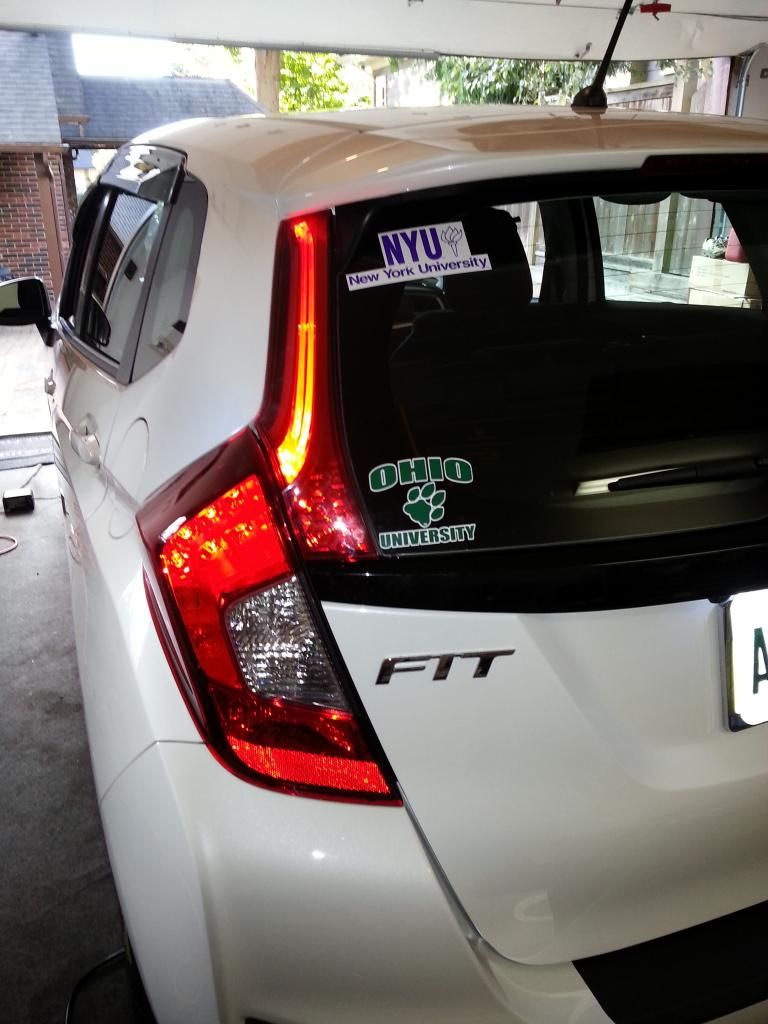
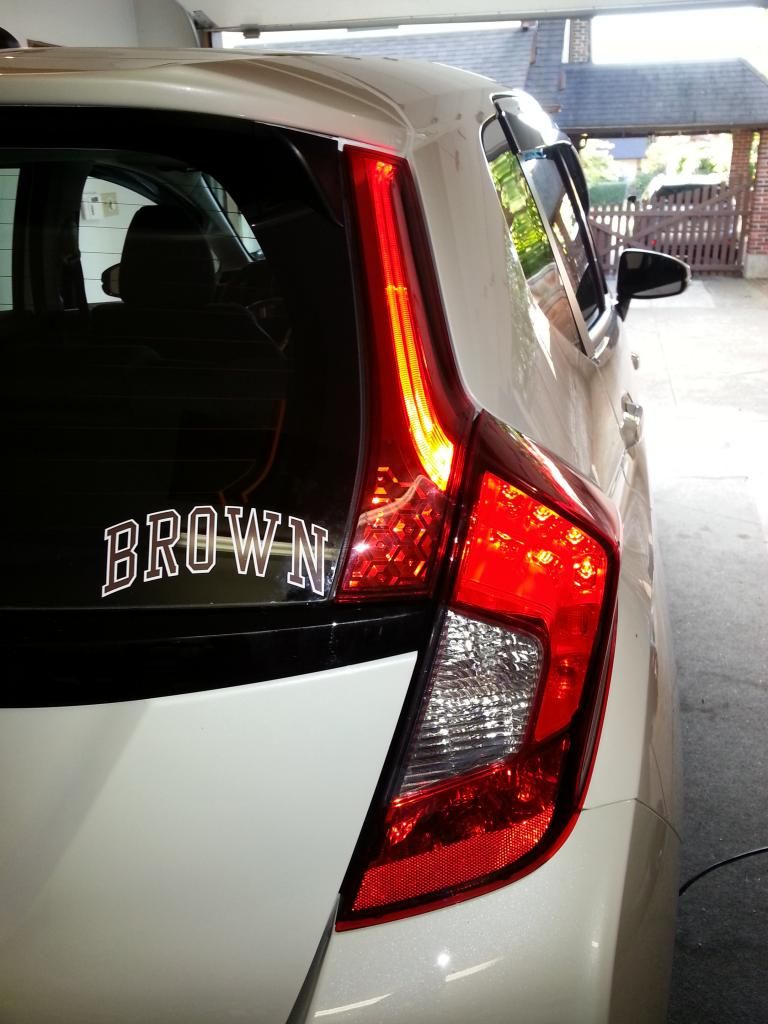
Final result with everything lighted up.


Me thinks it looks pretty good. Although must apologize for the crappy pics. Used the cell phone.
After removing the rear hatch trim, the connectors for the rear license plate are readily accessible. (gray colored). The far one (disconnected) is where I tapped the power. (Thanks to NORIPWR's helpful suggestion).
Next, drilled one hole on each side. Deburred them and applied WOP touch-up paint. Note the hole locations - its fits the grommet and length of the factory harness perfectly. Size of hole is 7/16".
Applied silicone grease on the grommet so it gets in the hole easily. Here's a pic before the final install of the LED fixture to the body. (BTW, the LED nut size is 5/16")
Final result with everything lighted up.
Me thinks it looks pretty good.
Although must apologize for the crappy pics. Used the cell phone.
Last edited by ROTTBOY; 10-01-2014 at 08:23 AM.
#489
09-30-2014, 10:30 PM
To all my FF friends and fellow FFs. have been busy the whole day doing this one install. The bad news, NONE!!! Didn't break a single thing. The good news, its installed and lighted.
After removing the rear hatch trim, the connectors for the rear license plate are readily accessible. (gray colored). The far one (disconnected) is where I tapped the power. (Thanks to NORIPWR's helpful suggestion).

Next, drilled one hole on each side. Deburred them and applied WOP touch-up paint. Note the location - its fits the grommet and length of the factory harness perfectly. Size of hole is 7/16".
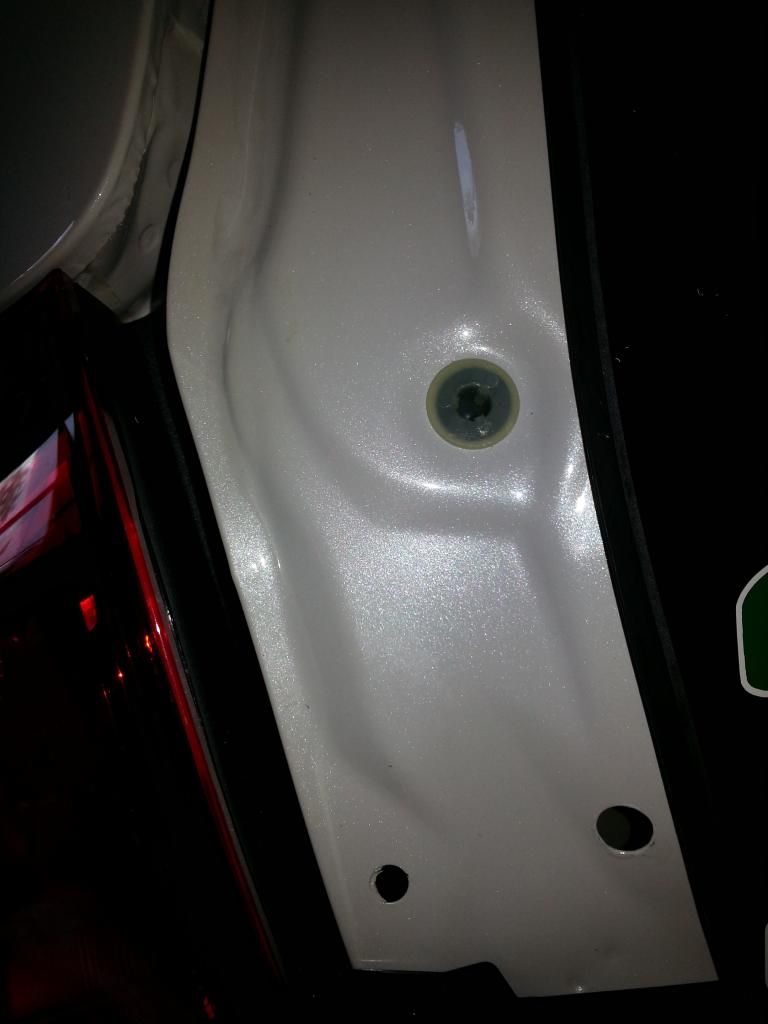
Applied silicone grease on the grommet so it gets in the hole easily. Here's a pic before the final install of the LED fixture to the body. (BTW, the LED bolt size is 5/16")
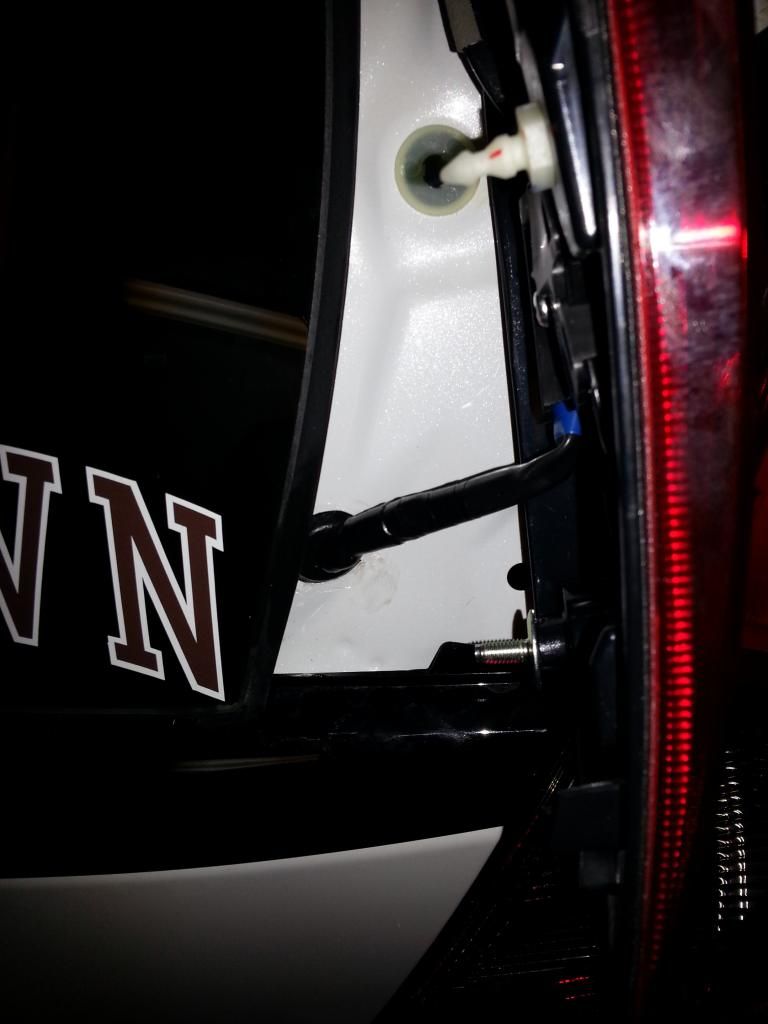
Final result with everything lighted up.
Me thinks it looks pretty good. Although must apologize for the crappy pics. Used the cell phone.
After removing the rear hatch trim, the connectors for the rear license plate are readily accessible. (gray colored). The far one (disconnected) is where I tapped the power. (Thanks to NORIPWR's helpful suggestion).
Next, drilled one hole on each side. Deburred them and applied WOP touch-up paint. Note the location - its fits the grommet and length of the factory harness perfectly. Size of hole is 7/16".
Applied silicone grease on the grommet so it gets in the hole easily. Here's a pic before the final install of the LED fixture to the body. (BTW, the LED bolt size is 5/16")
Final result with everything lighted up.
Me thinks it looks pretty good.
Although must apologize for the crappy pics. Used the cell phone.NIGHT shots rottboy! It looks gooooooood!
#490
09-30-2014, 10:48 PM

What's an Ohio Bobcat doing in Hawaii??? My coworker is a Bobcat, and I had a good time ribbing him when UK beat them at football a few weeks ago. I've been meaning to get up to Athens to visit Jackie O's.
#492
10-01-2014, 07:23 AM
Join Date: Mar 2014
Location: Hawaii: relocated to Western Canada Sept, 2015
Posts: 1,116
Big thanks to your suggestion. Will go to the auto shop tomrw and look for proper connectors to finalize the wiring. While the trim is off will tackle the sound-deadening for that area. For sure it will take another day!
SheepNutz 'ol buddy, nice to hear from you!!!!
OU is my alma mater. Unfortunately during my time Jackie O's didn't exist. Nevertheless, OU is the definition of "party school". Will never forget those days. As for UK, they didn't just beat us - they totally embarrased all loyal Bobcats!!!!
Mucho thanks F_M. Truly appreciate the recognition and numerous kudos.
Since there are various threads on this particular GK component, any questions on the install that I've missed, are all welcome.
Gotta a feeling that Honda will make this a standard item in the coming years. Its up to the GK FF community to beat the mfg. to the punch!!!!!
Last edited by ROTTBOY; 10-01-2014 at 08:24 AM.
#493
10-01-2014, 09:09 AM

Continuing to follow this thread with high interest - thanks for the detailed install photos, ROTT - looks great! Now we (USDM) just need a way to source these from JDM or AUDM (or ???). I already contacted a Honda dealer in Sydney, and they were unwilling to ship overseas. Waiting to hear back from an AU parts house - they asked for pics and part numbers. Will see what they come back with. If I do this, it will be all four lights (presuming the cost isn't too completely outrageous).
es
es
#495
10-01-2014, 12:25 PM
Just $1000?? I blew by that number in the first week... And that's with parts discounts on alot of stuff... You ain't kidding when you said it isn't cheap to read this thread. Every time I look at it someone has posted something else I want. Now to just wait on that slow boat from Japan....
To tell you the truth, I'm sure it's near or past the $2k mark, but ever since passing $1k I stopped thinking about it in the head. I mean, I know I'm going to put in another $1k to the car when I get new rims and tires ... just a matter of if I want Rotas, Volks, or lightweight rims + LRR tires for increasing mpg.
One of the mods I was thinking up was stripping the leather from my seats, perforating them, and then adding aftermarket cooling seat options. Or I can just get perforated Clazzios. That would've been about a $1k mod right there. But the little cheap $6 option from Home Depot I posted up seems to work really well anyway.
I think if possible & feasible, my next few mods would be the LED upper tails and JDM bumpers PAINTED
 .
.
#496
10-01-2014, 12:26 PM
Big thanks to your suggestion. Will go to the auto shop tomrw and look for proper connectors to finalize the wiring. While the trim is off will tackle the sound-deadening for that area. For sure it will take another day!
SheepNutz 'ol buddy, nice to hear from you!!!!
OU is my alma mater. Unfortunately during my time Jackie O's didn't exist. Nevertheless, OU is the definition of "party school". Will never forget those days. As for UK, they didn't just beat us - they totally embarrased all loyal Bobcats!!!!
Mucho thanks F_M. Truly appreciate the recognition and numerous kudos.
Since there are various threads on this particular GK component, any questions on the install that I've missed, are all welcome.
Gotta a feeling that Honda will make this a standard item in the coming years. Its up to the GK FF community to beat the mfg. to the punch!!!!!
LOL. Just realized Rottboy, you are now the first FF GK owner in the USA with LED upper tails.
#497
10-01-2014, 01:50 PM

To all my FF friends and fellow FFs. have been busy the whole day doing this one install. The bad news, NONE!!! Didn't break a single thing. The good news, its installed and lighted.
After removing the rear hatch trim, the connectors for the rear license plate are readily accessible. (gray colored). The far one (disconnected) is where I tapped the power. (Thanks to NORIPWR's helpful suggestion).
http://i925.photobucket.com/albums/a...ateharness.jpg
Next, drilled one hole on each side. Deburred them and applied WOP touch-up paint. Note the hole locations - its fits the grommet and length of the factory harness perfectly. Size of hole is 7/16".
http://i925.photobucket.com/albums/a...aintedhole.jpg http://i925.photobucket.com/albums/a...lelocation.jpg
Applied silicone grease on the grommet so it gets in the hole easily. Here's a pic before the final install of the LED fixture to the body. (BTW, the LED nut size is 5/16")
http://i925.photobucket.com/albums/a...thbackview.jpg
Final result with everything lighted up.
http://i925.photobucket.com/albums/a...ideLighted.jpg[IMG]http://i925.photobucket.com/albums/a...idelighted.jpg
Me thinks it looks pretty good. Although must apologize for the crappy pics. Used the cell phone.
After removing the rear hatch trim, the connectors for the rear license plate are readily accessible. (gray colored). The far one (disconnected) is where I tapped the power. (Thanks to NORIPWR's helpful suggestion).
http://i925.photobucket.com/albums/a...ateharness.jpg
Next, drilled one hole on each side. Deburred them and applied WOP touch-up paint. Note the hole locations - its fits the grommet and length of the factory harness perfectly. Size of hole is 7/16".
http://i925.photobucket.com/albums/a...aintedhole.jpg http://i925.photobucket.com/albums/a...lelocation.jpg
Applied silicone grease on the grommet so it gets in the hole easily. Here's a pic before the final install of the LED fixture to the body. (BTW, the LED nut size is 5/16")
http://i925.photobucket.com/albums/a...thbackview.jpg
Final result with everything lighted up.
http://i925.photobucket.com/albums/a...ideLighted.jpg[IMG]http://i925.photobucket.com/albums/a...idelighted.jpg
Me thinks it looks pretty good.
Although must apologize for the crappy pics. Used the cell phone.
#498
10-01-2014, 04:16 PM
Rottboy how is the Audison working out for you?? Is sound quality up to par even using the stock system?
#499
10-01-2014, 06:28 PM
Join Date: Mar 2014
Location: Hawaii: relocated to Western Canada Sept, 2015
Posts: 1,116
As far as ordering from Japan, it was a tough route for me. Forget about calling any Honda dealer as they won't entertain you unless you go there to p/u. They won't ship out.
My wife's relatives had to physically drive there in their Honda for the p/u. They give you a time for p/u and expect the buyer to be prompt. Guess its a result of their "just in time" inventory practises.
Here's a tip. PM Japan Tragic (organize a group buy). He will be willing to do this with his standard mark-up for his services. He's a great guy!!!
Thanks man!!!
Although the wiring was temporary, read-on and you'll see the other work I did since 6am.Will start sound deadening the doors, then the trunk floor, rear wheel wells, rear passenger floor, front floor, tranny tunnel and finally floor boards under the dash. This will surely take me a week.
Once done, will start with the wiring, speaker/tweeter, sub-woofer, Audison and Kenwood amp. placement.
You'll be the first to know what I think it sounds like when I'm all done.
Jason, your one guy not to forget. Your comprehensive written/ video observations on the Fit drive earlier this year
convinced me (as well as a ton of FF members) that I made the right choice. Here's what was done today:
- Finished up the wiring for the LED rear tail. Decided to split the power tap and used both license plate wires. Used wire tubing to protect and prevent rattling. All wire connection are soldered and covered with either shrink wrap or rubber electrical tape. The pic shows 2 black connectors used to simplify any future removal just in case either one of the LED's ever needs replacement.

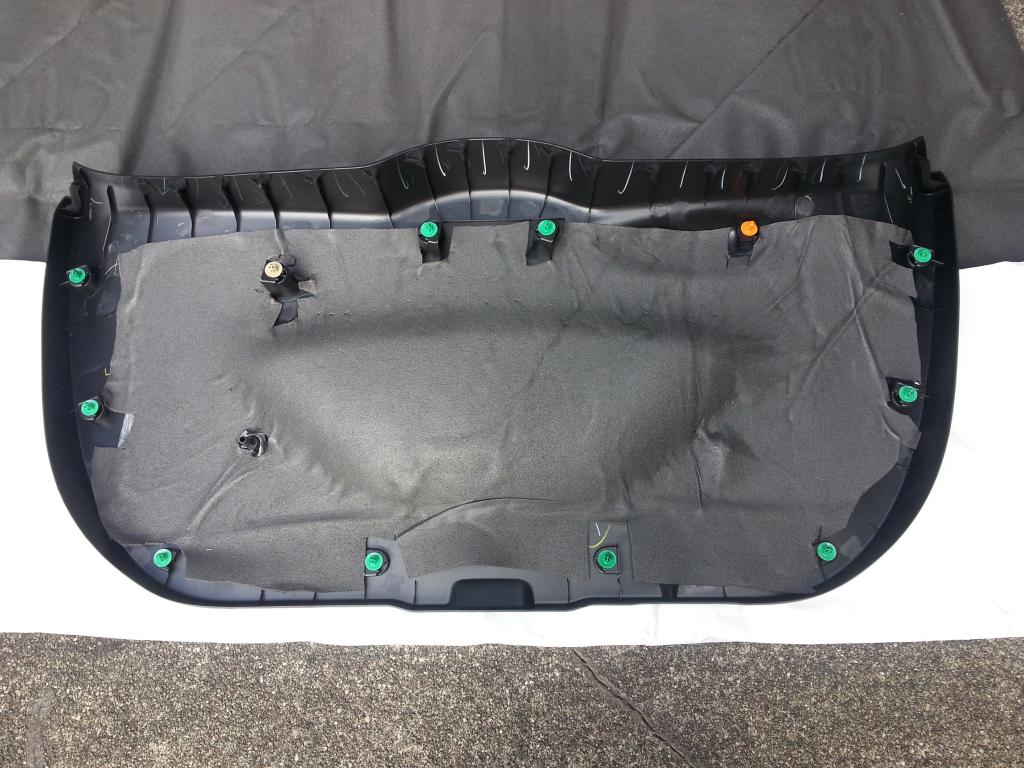
- Since the hatch trim was off, installed CLD tiles in the inner and outer portions. Then added CCF to the hatch trim. (purchased from RAAMaudio - Jason is super helpful with lotsa tips)

- First pic of the full Fit outside the garage after starting mod install 4 days ago.
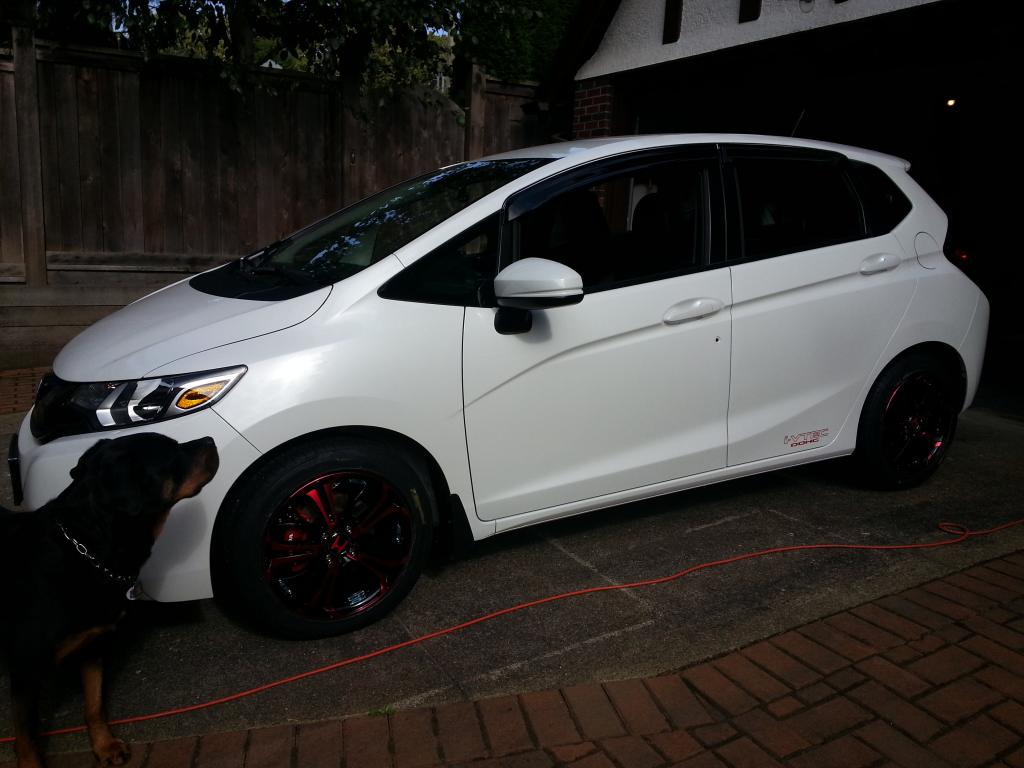
Its now time for some BEER!!!!!
Last edited by ROTTBOY; 10-02-2014 at 12:47 AM.
#500
10-02-2014, 06:51 AM
First mods/accessories: Ziebart ceramic tint 70/20, paint protection film on the hood, grill, front bumper, headlights, and front fender tips, Diamond Gloss paint sealant, fabric/carpet protection, and rustproofing, undercoat/sound deadener. We hope to keep this car for 15 years or so, driving in salt water every winter. Wish we'd have done this on our truck.