
DIY: Install Cup Holder LED's GE8
#1
 08-31-2009, 04:55 PM


DIY: Install Cup Holder LED's GE8
***DISCLAIMER*** FIT FREAK NOR AM I NOT RESPONSIBLE FOR ANY MODIFICATIONS DONE TO YOUR CAR. THIS THREAD IS HERE ONLY TO ASSIST YOU IN YOUR INSTALLATION OF THE LED's in the Cup holder area.
With that out of the way... (OVERVIEW):
I dont know if Honda was lazy or they felt it wasnt necessary, but the thing that bothered me was i couldnt see a damn thing in the car at night. i had to feel around for stuff especially around the cup holder area. my scion tc and my dads TL all have Leds near the headliner that shine down and illuminate the center console. however i did not want to cut up the headliner because thats a big piece to replace in the case you mess up. so i chose to do it in the panel right above the cup holders. So like the TL and the tC, the LED's turn on when you turn the parking lights and head lights on, so i followed suite.
supplies:
1. two 3mm LEDs (color of your choice)
2. two 3mm LED holders
3. several feet of 18-22 gauge wire (whichever gauge u want to use)
4. wire strippers
5. power drill
6. 1/4" wire loom
7. one wire tap
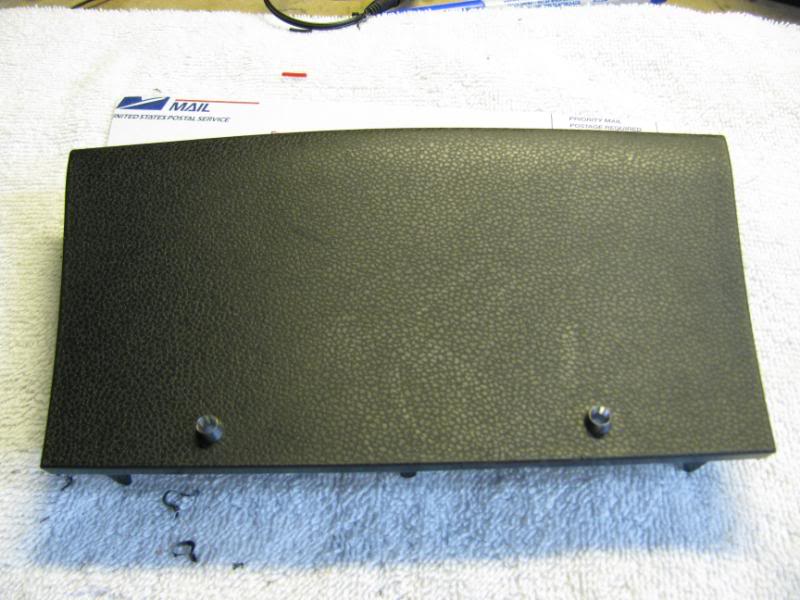
1. take out the panel by using a SUPER stiff wire hook. place the hook under the panel and tug. found this to be the easiest. damn panel is hard to take off.
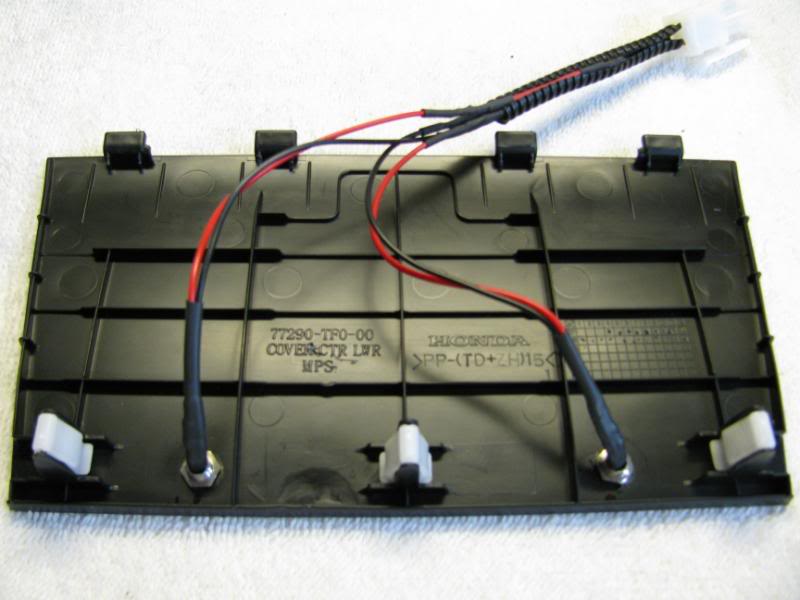
2. look at the back side of the panel and mark off where u want the LEDs to sit. for mine, i drilled the holes near the bottom because i do not want to see the LED holders or LED when driving the car, but its up to you. the way i did it was trace the panel onto a piece of cardboard and by using some measurements drilled the cardboard. i essentially made a mock piece to see if i liked the placement of the LED's. I will later update this DIY by posting up a template for you guys to print out and cut out if you like my placement.

3. this is what it essentially looks like for the wiring. just solder the + together and have one wire lead, same goes for the -. i used a connector in case i wanted to take the panel out i wouldnt have to cut the wire at the fuse box and re-tap.
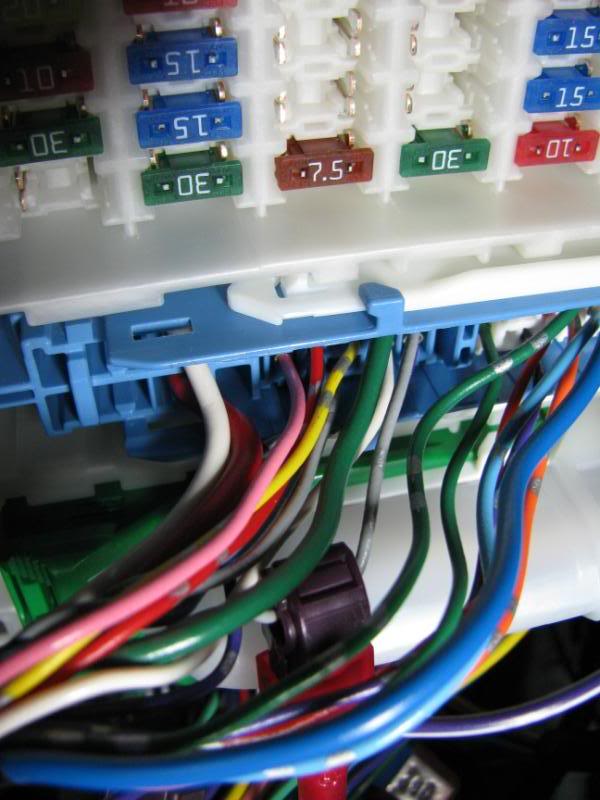
4. time to route the wires from under the dash. where you zip tie the wire loom is totally up to you. just make sure its away from moving parts (i.e the steering column, brake and gas pedal). now look at the fuse panel where all the connectors are. there are 3 BIG connectors, from top to bottom: blue, green, white. you want to tap into a wire thats in the blue top connector. the wire you want is GRAY and is i think the 7th from the left on the top row. you can see the tap i used. use your + wire to tap into this because it is a switched power (by the headlight/parking light switch). found this by using my multimeter for about 1 hour hahah.
5. now that u tapped into this with the power wire, take your ground wire and chasis ground it somewhere.
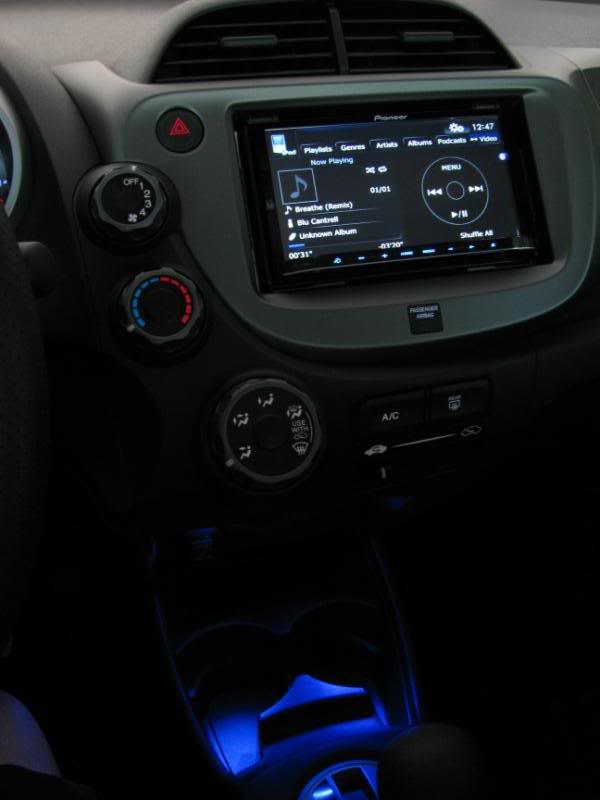
6. and now check if they turn on with the headlight switch and voila:
(sorry for the blurry pic, all i had were my hands and holding my breath haha no tripod)

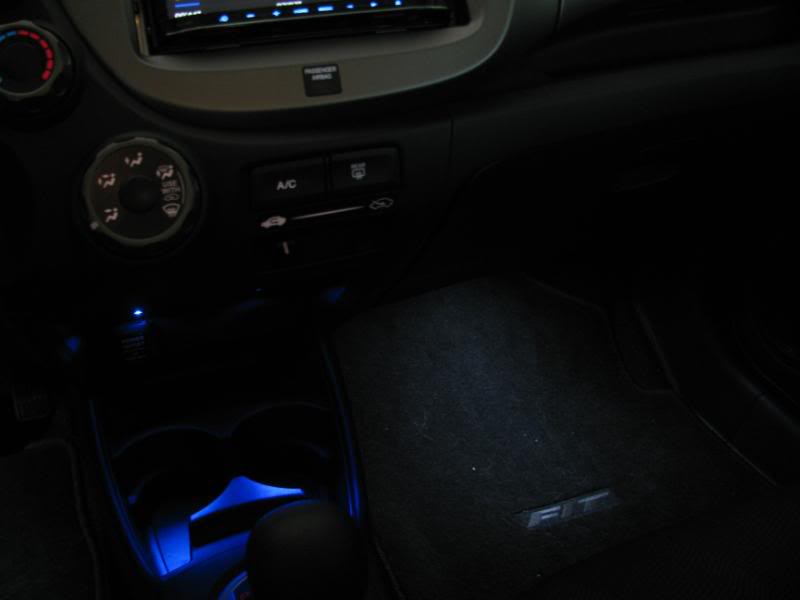
when your driving you cant see the LEDs directly. that was my main objective. its reflective light. oh and like my foot well lights? lol oh im just guessing here... FIRST 2009 Honda Fit with the new Pioneer Avic Z110BT (of course DIY'd also )
With that out of the way... (OVERVIEW):
I dont know if Honda was lazy or they felt it wasnt necessary, but the thing that bothered me was i couldnt see a damn thing in the car at night. i had to feel around for stuff especially around the cup holder area. my scion tc and my dads TL all have Leds near the headliner that shine down and illuminate the center console. however i did not want to cut up the headliner because thats a big piece to replace in the case you mess up. so i chose to do it in the panel right above the cup holders. So like the TL and the tC, the LED's turn on when you turn the parking lights and head lights on, so i followed suite.
supplies:
1. two 3mm LEDs (color of your choice)
2. two 3mm LED holders
3. several feet of 18-22 gauge wire (whichever gauge u want to use)
4. wire strippers
5. power drill
6. 1/4" wire loom
7. one wire tap
1. take out the panel by using a SUPER stiff wire hook. place the hook under the panel and tug. found this to be the easiest. damn panel is hard to take off.
2. look at the back side of the panel and mark off where u want the LEDs to sit. for mine, i drilled the holes near the bottom because i do not want to see the LED holders or LED when driving the car, but its up to you. the way i did it was trace the panel onto a piece of cardboard and by using some measurements drilled the cardboard. i essentially made a mock piece to see if i liked the placement of the LED's. I will later update this DIY by posting up a template for you guys to print out and cut out if you like my placement.
3. this is what it essentially looks like for the wiring. just solder the + together and have one wire lead, same goes for the -. i used a connector in case i wanted to take the panel out i wouldnt have to cut the wire at the fuse box and re-tap.
4. time to route the wires from under the dash. where you zip tie the wire loom is totally up to you. just make sure its away from moving parts (i.e the steering column, brake and gas pedal). now look at the fuse panel where all the connectors are. there are 3 BIG connectors, from top to bottom: blue, green, white. you want to tap into a wire thats in the blue top connector. the wire you want is GRAY and is i think the 7th from the left on the top row. you can see the tap i used. use your + wire to tap into this because it is a switched power (by the headlight/parking light switch). found this by using my multimeter for about 1 hour hahah.
5. now that u tapped into this with the power wire, take your ground wire and chasis ground it somewhere.
6. and now check if they turn on with the headlight switch and voila:
(sorry for the blurry pic, all i had were my hands and holding my breath haha no tripod)
when your driving you cant see the LEDs directly. that was my main objective. its reflective light. oh and like my foot well lights? lol
oh im just guessing here... FIRST 2009 Honda Fit with the new Pioneer Avic Z110BT (of course DIY'd also )

#4
09-01-2009, 01:46 AM
thanks guys!
GE sway: sure! let me kno how yours turns out. i think mostly people are interested in which wire to tap haha. took me forever with a broken back down there to find it lol
GE sway: sure! let me kno how yours turns out. i think mostly people are interested in which wire to tap haha. took me forever with a broken back down there to find it lol
#6
09-01-2009, 07:57 AM

+reps for your efforts.. thank you.
After I installed my JDM cig lighter in the panel below the panel you installed the LED's on, I noticed I couldn't see where the outlet was...
 leading me to cause some slight burn marks around the cig lighter outlet... Now that you found a great location to tap for the LED's I can replace that panel, and drill a hole in the center to reinstall the Acc outlet. Since I'm using the factory connection for the cig lighter, all I have to do now is decide where I want to tap the Acc outlet. I've seen the other DIY where they just tapped in to the same wires/harness, but I'm not sure if that's the best way for me.
 Any suggestions?
#7
09-01-2009, 12:38 PM
good job!
anyone know the fuse that has the delay'ed turn-off on the GE? i have blue LED's wired up on my GD's cupholder area where it's on all the time while the car is ON (this is how i want it) and it takes about 30sec for the LED to shut off after i take out the
keys from the ignition. it's very convenient.
my wife's been asking me to wire up a LED on the GE so hoping someone has this info... otherwise im going to wire up to a switched wire. the reason why i like to have it on even during the day is when you enter a dim parking structure (not dark enough to use headlights) i can still see my drink clearly.
#8
09-01-2009, 03:24 PM
Fuse Taps (4-Pack) - RadioShack.com
good job!
anyone know the fuse that has the delay'ed turn-off on the GE? i have blue LED's wired up on my GD's cupholder area where it's on all the time while the car is ON (this is how i want it) and it takes about 30sec for the LED to shut off after i take out the
keys from the ignition. it's very convenient.
my wife's been asking me to wire up a LED on the GE so hoping someone has this info... otherwise im going to wire up to a switched wire. the reason why i like to have it on even during the day is when you enter a dim parking structure (not dark enough to use headlights) i can still see my drink clearly.
anyone know the fuse that has the delay'ed turn-off on the GE? i have blue LED's wired up on my GD's cupholder area where it's on all the time while the car is ON (this is how i want it) and it takes about 30sec for the LED to shut off after i take out the
keys from the ignition. it's very convenient.
my wife's been asking me to wire up a LED on the GE so hoping someone has this info... otherwise im going to wire up to a switched wire. the reason why i like to have it on even during the day is when you enter a dim parking structure (not dark enough to use headlights) i can still see my drink clearly.
Last edited by chubbykai; 09-01-2009 at 03:31 PM.
#9
09-01-2009, 08:45 PM

Please stop using "vampire" connectors to tap power. They can damage the wire you are taping into.
Add-a- circuit fuse adapters will do the same thing, plus they give you fuse for the circuit you are adding while keeping the original fuse for the original circuit.
This is what they look like.
ATM Mini Add-A-Circuit Fuse Holder Tap
Add-a- circuit fuse adapters will do the same thing, plus they give you fuse for the circuit you are adding while keeping the original fuse for the original circuit.
This is what they look like.
ATM Mini Add-A-Circuit Fuse Holder Tap
#10
09-01-2009, 08:51 PM
yea i dont really like tapping into stock wiring harnesses. i actually should have found the fuse and used a fuse tap... thanks for the reminder. i guess next time! haha. the add a circuit fuse holder tap would be nice if there is an empty fuse location such as a constant or switched power.
#11
09-22-2009, 05:26 AM
KC - the wires you want to make lights come on with door opening are here.
It is the green plug with the blue and pink wires. I used "vampire" connectors on them.
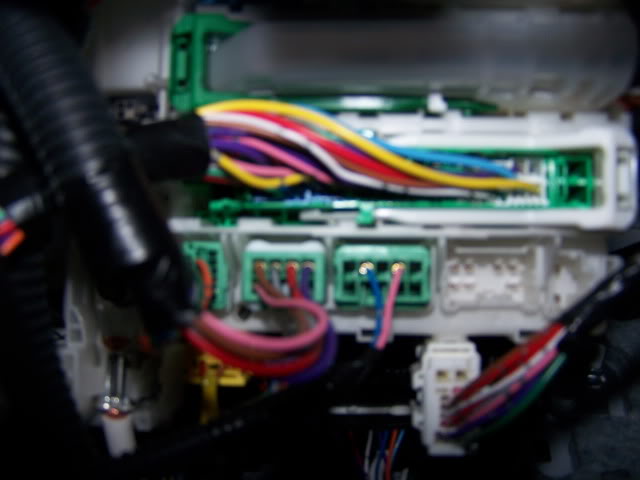
I just stuck the ends of the LED wires to each to see which was which then used the connectors.
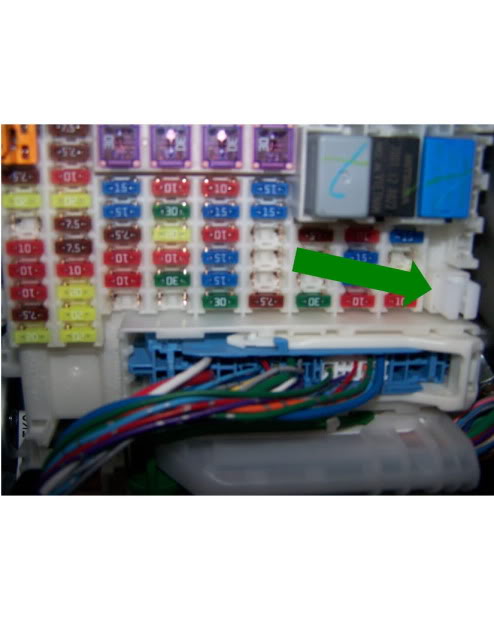
The fue would be hard to add too ad it is the 10amp one under the orange thing inthe top left corner in this pic. The arrow pints to the fuse puller if you need it
It is the green plug with the blue and pink wires. I used "vampire" connectors on them.
I just stuck the ends of the LED wires to each to see which was which then used the connectors.
The fue would be hard to add too ad it is the 10amp one under the orange thing inthe top left corner in this pic. The arrow pints to the fuse puller if you need it


#15
10-20-2009, 07:49 PM
lol it takes a good amount of force to pull it out. like really a good amount of force. the clips are strong. you can try using a hook cuz i know my fingers werent strong enough to pull the panel out.

Thread
Thread Starter
Forum
Replies
Last Post
chubbykai
2nd Generation GE8 Specific DIY: Repair & Maintenance Sub-Forum
32
08-03-2018 12:13 AM
Crawly
Fit Interior & Exterior Illumination
1
11-14-2012 03:37 PM
chubbykai
Fit Interior & Exterior Illumination
2
09-06-2009 05:05 AM