
Lower grill removal...
#1
 06-20-2009, 03:19 AM

Do I need five hands for this or what?  There are two expander pins at the bottom which are a snap to remove. There are five "tabs" along the top edge along the inside. I'm reaching down from the top and pushing on these...does the grill release and pull "out" or is it released and pushed into the cavity? I'm pushin' and pullin' and can't tell which way this mother fugger needs to go...
It's late. I'm buzzed. But not so much that I don't care if something breaks
A little guidance would be appreciated...I assumed the grill would be pushed in from the front but now I'm not so sure.
There are two expander pins at the bottom which are a snap to remove. There are five "tabs" along the top edge along the inside. I'm reaching down from the top and pushing on these...does the grill release and pull "out" or is it released and pushed into the cavity? I'm pushin' and pullin' and can't tell which way this mother fugger needs to go...It's late. I'm buzzed. But not so much that I don't care if something breaks
A little guidance would be appreciated...I assumed the grill would be pushed in from the front but now I'm not so sure.
#4
06-22-2009, 11:13 AM
Thanks jimbob...I was really hoping for "it pulls out to the front" My Mugen grill is not made to be installed and removed easily with it's 3M adhesive all along the lower trim and I don't think there will be enough room to pass the grill up and out with the Mugen in place 
I guess I'll just order another lower from Bernardi for 35 bucks so I can get my project going...
Thanks again...
M
My Mugen grill is not made to be installed and removed easily with it's 3M adhesive all along the lower trim and I don't think there will be enough room to pass the grill up and out with the Mugen in place I guess I'll just order another lower from Bernardi for 35 bucks so I can get my project going...
Thanks again...
M
#6
06-28-2009, 07:40 PM
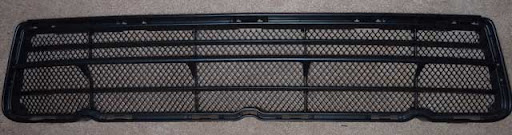
Okay, since I've taken the time to remove my grill I may as well post some pics for future reference and add a little "how to"...
To make this as easy as possible you need to remove the upper shroud. This is the plastic piece that "links" the top of your upper grill to the frame/chassis. This is a simple removal. Eight "pop" clips that are easily removed with a flat head screw driver. Simply insert the screw driver and twist/pry the center of the "popper" up and wiggle it out. The two outer "poppers" are a different length so make sure to keep them seperate from the other six.
To make it even easier and give yourself more access you can remove the upper grill as well. This consists of two self tapping screws and four more "poppers" along the bottom edge of the grill. You need either a "stubby" philips screw driver or a right angle philips. A ratcheting right angle screw driver is even better

Once all the upper garb is out of the way you can reach down from the top much easier. I have a Mugen grill so this little luxury is not available to me Not that big a deal though...unless you have uber pumped up biceps you will be able to reach down from the top.

There are five "tabs" across the top, four "tabs" that you can't see across the bottom, two "tabs" at each end and two "poppers" at the bottom of your lower grill.
Start with removing the two poppers. Next, put your hand through the front of the grill and push "up" on the upper tabs.


Work your way from left to right (or right to left). All you want to do is dislodge the grill along the upper edge by an 1/8" or so. Using a flash light you will be able to see these tabs by laying on your back.
Once the top is dislodged you need to reach in from the top where you removed the upper plastic. When you feel along the bottom edge you will locate the four bottom tabs.


Givem' a good feel The easliy moved wide portion is the nose plastic. The thicker part that you feel is the actual grill clip. I used a .035 thick feeler gauge and slid it in between the nose plastic and clip and gave it a little twist and pushed from the face. Again, dislodge the lower all along the lower edge. Once you have the grill dislodged across the top and bottom it's a matter of pushing it inward. Once it pops free into the nose cavity you can simply lay it on it's side and pull it out the nose.
And now your grill is out...what are you going to do now?
To make this as easy as possible you need to remove the upper shroud. This is the plastic piece that "links" the top of your upper grill to the frame/chassis. This is a simple removal. Eight "pop" clips that are easily removed with a flat head screw driver. Simply insert the screw driver and twist/pry the center of the "popper" up and wiggle it out. The two outer "poppers" are a different length so make sure to keep them seperate from the other six.
To make it even easier and give yourself more access you can remove the upper grill as well. This consists of two self tapping screws and four more "poppers" along the bottom edge of the grill. You need either a "stubby" philips screw driver or a right angle philips. A ratcheting right angle screw driver is even better

Once all the upper garb is out of the way you can reach down from the top much easier. I have a Mugen grill so this little luxury is not available to me
Not that big a deal though...unless you have uber pumped up biceps you will be able to reach down from the top.
There are five "tabs" across the top, four "tabs" that you can't see across the bottom, two "tabs" at each end and two "poppers" at the bottom of your lower grill.
Start with removing the two poppers. Next, put your hand through the front of the grill and push "up" on the upper tabs.


Work your way from left to right (or right to left). All you want to do is dislodge the grill along the upper edge by an 1/8" or so. Using a flash light you will be able to see these tabs by laying on your back.
Once the top is dislodged you need to reach in from the top where you removed the upper plastic. When you feel along the bottom edge you will locate the four bottom tabs.


Givem' a good feel
The easliy moved wide portion is the nose plastic. The thicker part that you feel is the actual grill clip. I used a .035 thick feeler gauge and slid it in between the nose plastic and clip and gave it a little twist and pushed from the face. Again, dislodge the lower all along the lower edge. Once you have the grill dislodged across the top and bottom it's a matter of pushing it inward. Once it pops free into the nose cavity you can simply lay it on it's side and pull it out the nose.And now your grill is out...what are you going to do now?
Last edited by Malice101; 06-28-2009 at 08:38 PM.


#12
01-11-2012, 12:53 AM
so other threads talk about this. i bought a gutter cover which looks pretty cool but i am confused about removing the "lower grille" to add the screen. is this a piece that actually comes out?
#13
01-11-2012, 06:57 AM
I followed the instructions posted on 6/29/09 by Malice01 earlier in this thread and it worked great. You just need to order the mess online for a few $$$, and buy some black wire ties/tyraps at Lowes'.
This AC condenser is a common Honda problem, and expensive to fit if damaged.
This AC condenser is a common Honda problem, and expensive to fit if damaged.
#15
01-11-2012, 10:09 PM
Looks like gutter guard from a big box home store. I imagine it would work with any expanded metal mesh.
#18
01-13-2012, 12:02 AM
i bought the gutter guard (and longa$$ zip ties) from home depot, going to try this deal this weekend. but again there is a piece from the lower area that pops out? i'm confused! i thought the mesh had to be dropped down inside and then attached with zip ties to the main actual bumper
#19
01-13-2012, 12:13 AM
i bought the gutter guard (and longa$$ zip ties) from home depot, going to try this deal this weekend. but again there is a piece from the lower area that pops out? i'm confused! i thought the mesh had to be dropped down inside and then attached with zip ties to the main actual bumper
#20
01-26-2012, 02:18 PM
i bought the gutter guard (and longa$$ zip ties) from home depot, going to try this deal this weekend. but again there is a piece from the lower area that pops out? i'm confused! i thought the mesh had to be dropped down inside and then attached with zip ties to the main actual bumper